揭露NSDictionary
Hash tables are just awesome. To this day I find it fascinating that one can fetch an object corresponding to an arbitrary key in a constant time. Although iOS 6.0 introduced an explicit hash table, it is NSDictionary that’s almost exclusively used for associative storage. 哈希表非常棒。直到今天,我仍然觉得在固定的时间内获取与任意键对应的对象是一件非常有趣的事情。虽然iOS 6.0引入了显式哈希表,但NSDictionary几乎只用于关联存储。
NSDictionary doesn’t make any promise of its internal implementation. It would make little sense for a dictionary to store its data in a completely random fashion. However, this assumption doesn’t answer the key question: does NSDictionary make use of a hash table? This is what I’ve decided to investigate. NSDictionary没有对它的内部实现做任何承诺。字典以完全随机的方式存储数据是没有意义的。然而,这个假设并没有回答关键问题:NSDictionary是否使用了哈希表?这就是我决定要调查的。
Why not to tackle the full featured NSMutableDictionary? A mutable dictionary is, understandably, much more complex and the amount of disassembly I would have had to go through was terrifying. Regular NSDictionary still provided a nontrivial ARM64 deciphering challenge. Despite being immutable, the class has some very interesting implementation details which should make the following ride enjoyable. 为什么不处理功能齐全的NSMutableDictionary呢?可以理解的是,一个易变的字典要复杂得多,而且我需要进行的分解量非常可怕。普通的NSDictionary仍然提供了一个重要的ARM64解码挑战。尽管该类是不可变的,但它有一些非常有趣的实现细节,这些细节应该会使下面的过程变得愉快。
This blog post has a companion repo which contains discussed pieces of code. While the entire investigation has been based on the iOS 7.1 SDK targeting a 64-bit device, neither iOS 7.0 nor 32-bit devices impact the findings. 这篇博客文章有一个附带的repo,其中包含讨论过的代码片段。虽然整个调查基于针对64位设备的iOS 7.1 SDK,但iOS 7.0和32位设备都没有影响调查结果。
The Class 类
Plenty of Foundation classes are class clusters and NSDictionary is no exception. For quite a long time NSDictionary used CFDictionary as its default implementation, however, starting with iOS 6.0 things have changed: 很多基础类都是类簇,NSDictionary也不例外。在相当长的一段时间内,NSDictionary使用CFDictionary作为它的默认实现,然而,从iOS 6.0开始,事情发生了变化:
(lldb) po [[NSDictionary new] class]
__NSDictionaryI
Similarly to __NSArrayM, __NSDictionaryI rests within the CoreFoundation framework, in spite of being publicly presented as a part of Foundation. Running the library through class-dump generates the following ivar layout: 与__NSArrayM类似,__NSDictionaryI位于CoreFoundation框架内,尽管它是作为Foundation的一部分公开呈现的。通过类转储运行库会生成以下ivar布局:
@interface __NSDictionaryI : NSDictionary
{
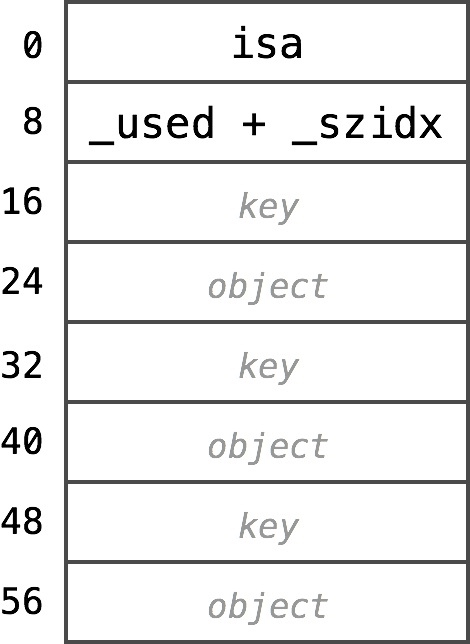
NSUIngeter _used:58;
NSUIngeter _szidx:6;
}
It’s surprisingly short. There doesn’t seem to be any pointer to either keys or objects storage. As we will soon see, __NSDictionary literally keeps its storage to itself. 这是令人惊讶的短。似乎没有任何指向键或对象存储的指针。正如我们将很快看到的,__NSDictionary字面上保持它的存储。
The Storage 存储
Instance Creation 实例创建
To understand where __NSDictionaryI keeps its contents, let’s take a quick tour through the instance creation process. There is just one class method that’s responsible for spawning new instances of __NSDictionaryI. According to class-dump, the method has the following signature: 为了理解__NSDictionaryI的内容保存在何处,让我们快速浏览一下实例创建过程。只有一个类方法负责生成__NSDictionaryI的新实例。根据class-dump,该方法具有以下特征:
+ (id)__new:(const id *)arg1:(const id *)arg2:(unsigned long long)arg3:(_Bool)arg4:(_Bool)arg5;
It takes five arguments, of which only the first one is named. Seriously, if you were to use it in a @selector statement it would have a form of @selector(__new:::::). The first three arguments are easily inferred by setting a breakpoint on this method and peeking into the contents of x2, x3 and x4 registers which contain the array of keys, array of objects and number of keys (objects) respectively. Notice, that keys and objects arrays are swapped in comparison to the public facing API which takes a form of:
它需要五个参数,其中只有第一个参数被命名。说真的,如果你在@selector语句中使用它,它会有@selector(__new:::::)的形式。通过在该方法上设置断点,窥探分别包含键数组、对象数组和键数(对象)的x2、x3和x4寄存器的内容,可以很容易地推断出前三个参数。注意,与采用以下形式的面向公共API相比,键和对象数组是交换的:
+ (instancetype)dictionaryWithObjects:(const id [])objects forKeys:(const id <NSCopying> [])keys count:(NSUInteger)cnt;
It doesn’t matter whether an argument is defined as const id * or const id [] since arrays decay into pointers when passed as function arguments.
无论参数定义为const id *还是const id[],都没有关系,因为数组在作为函数参数传递时将衰减为指针。
With three arguments covered we’re left with the two unidentified boolean parameters. I’ve done some assembly digging with the following results: the fourth argument governs whether the keys should be copied, and the last one decides whether the arguments should not be retained. We can now rewrite the method with named parameters: 有了三个参数,我们就剩下了两个身份不明的布尔参数。我对程序集进行了一些挖掘,结果如下:第四个参数控制是否应该复制键,最后一个参数决定是否不应该保留参数。我们现在可以用命名参数重写这个方法:
+ (id)__new:(const id *)keys :(const id *)objects :(unsigned long long)count :(_Bool)copyKeys :(_Bool)dontRetain;
Unfortunately, we don’t have explicit access to this private method, so by using the regular means of allocation the last two arguments are always set to YES and NO respectively. It is nonetheless interesting that __NSDictionaryI is capable of a more sophisticated keys and objects control.
不幸的是,我们不能显式地访问这个私有方法,因此通过使用常规的分配方法,最后两个参数总是分别设置为YES和NO。尽管如此,有趣的是__NSDictionaryI能够提供更复杂的键和对象控件。
Indexed ivars索引的实例变量
Skimming through the disassembly of + __new::::: reveals that both malloc and calloc are nowhere to be found. Instead, the method calls into __CFAllocateObject2 passing the __NSDictionaryI class as first argument and requested storage size as a second. Stepping down into the sea of ARM64 shows that the first thing __CFAllocateObject2 does is call into class_createInstance with the exact same arguments.
浏览+ __new::::的分解可以发现malloc和calloc都不存在。相反,该方法调用__CFAllocateObject2,将__NSDictionaryI类作为第一个参数传递,并将请求的存储大小作为第二个参数传递。步入ARM64的海洋显示__CFAllocateObject2所做的第一件事是使用完全相同的参数调用class_createInstance。
Fortunately, at this point we have access to the source code of Objective-C runtime which makes further investigation much easier. 幸运的是,现在我们可以访问Objective-C运行时的源代码,这使得进一步的研究更加容易。
The class_createInstance(Class cls, size_t extraBytes) function merely calls into _class_createInstanceFromZonepassing nil as a zone, but this is the final step of object allocation. While the function itself has many additional checks for different various circumstances, its gist can be covered with just three lines:
class_createInstance(Class cls, size_t extraBytes)函数只调用_class_createInstanceFromZone,并将nil作为区域传递,但这是对象分配的最后一步。虽然函数本身针对不同的情况有很多额外的检查,但是它的要点可以用三行来描述:
_class_createInstanceFromZone(Class cls, size_t extraBytes, void *zone)
{
    ...
    size_t size = cls->alignedInstanceSize() + extraBytes;
    ...
    id obj = (id)calloc(1, size);
    ...
    return obj;
}
The extraBytes argument couldn’t have been more descriptive. It’s literally the number of extra bytes that inflate the default instance size. As an added bonus, notice that it’s the calloc call that ensures all the ivars are zeroed out when the object gets allocated.
tb级的争论再好不过了。它实际上是膨胀默认实例大小的额外字节数。另外,请注意,calloc调用确保在分配对象时将所有ivar归零。
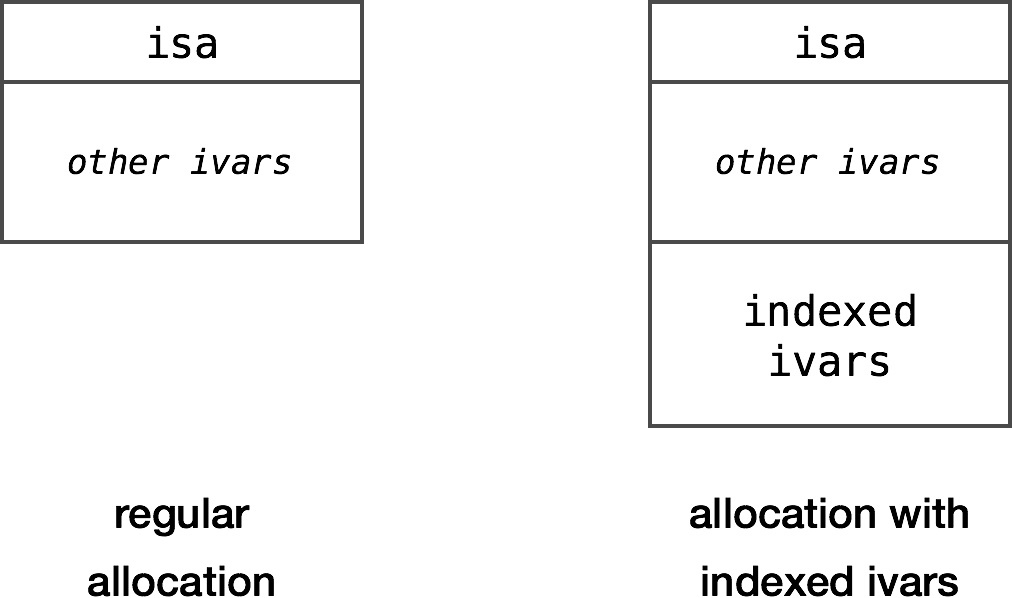
The indexed ivars section is nothing more than an additional space that sits at the end of regular ivars: 索引ivars部分只不过是位于常规ivars末尾的一个额外空间:
 Allocating objects
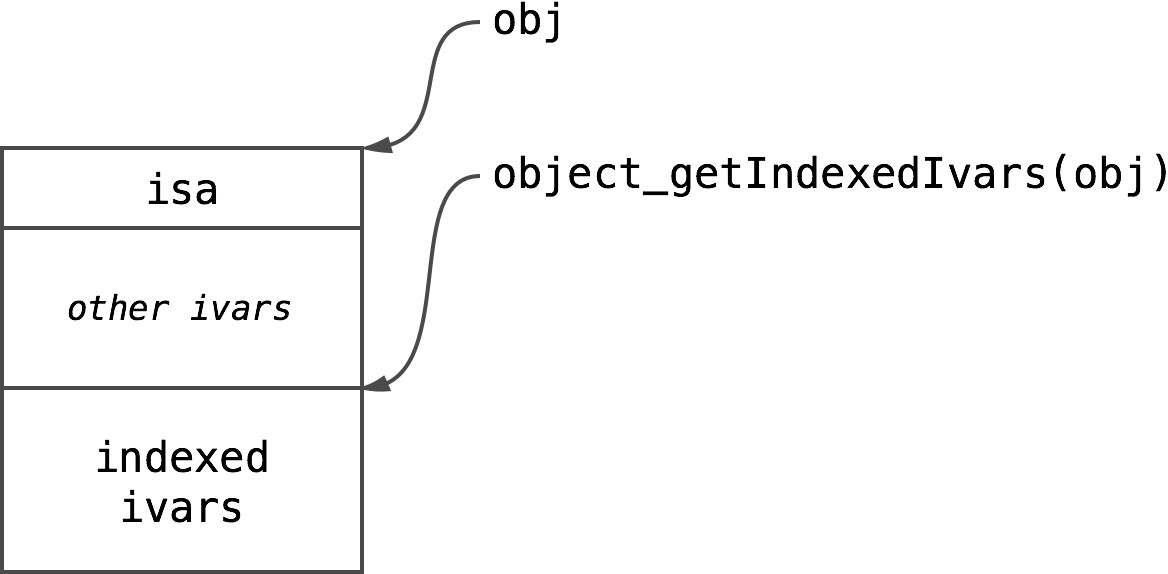
Allocating space on its own doesn’t sound very thrilling so the runtime publishes an accessor: 单独分配空间听起来并不令人兴奋,因此运行时发布一个访问器:
void *object_getIndexedIvars(id obj)
There is no magic whatsoever in this function, it just returns a pointer to the beginning of indexed ivars section: 这个函数中没有任何神奇之处,它只是返回一个指向索引ivars部分开头的指针:
 Indexed ivars section
There are few cool things about indexed ivars. First of all, each instance can have different amount of extra bytes dedicated to it. This is exactly the feature __NSDictionaryI makes use of.
索引ivar很少有很酷的地方。首先,每个实例可以有不同数量的额外字节。这正是__NSDictionaryI使用的特性。
Secondly, they provide faster access to the storage. It all comes down to being cache-friendly. Generally speaking, jumping to random memory locations (by dereferencing a pointer) can be expensive. Since the object has just been accessed (somebody has called a method on it), it’s very likely that its indexed ivars have landed in cache. By keeping everything that’s needed very close, the object can provide as good performance as possible. 其次,它们提供了更快的存储访问。这一切都归结为缓存友好。一般来说,跳转到随机内存位置(通过取消指针引用)可能很昂贵。由于对象刚刚被访问(有人对其调用了一个方法),它的索引ivar很可能已经落在缓存中。通过将所有需要的东西保持在非常接近的位置,对象可以提供尽可能好的性能。
Finally, indexed ivars can be used as a crude defensive measure to make object’s internals invisible to the utilities like class-dump. This is a very basic protection since a dedicated attacker can simply look for object_getIndexedIvars calls in the disassembly or randomly probe the instance past its regular ivars section to see what’s going on.
最后,索引ivars可以用作一种粗略的防御措施,使类转储之类的实用程序看不到对象的内部结构。这是一种非常基本的保护,因为专门的攻击者可以简单地在反汇编中查找object_getIndexedIvars调用,或者通过实例的常规ivars部分随机探测实例,看看发生了什么。
While powerful, indexed ivars come with two caveats. First of all, class_createInstance can’t be used under ARC, so you’ll have to compile some parts of your class with -fno-objc-arc flag to make it shine. Secondly, the runtime doesn’t keep the indexed ivar size information anywhere. Even though dealloc will clean everything up (as it calls free internally), you should keep the storage size somewhere, assuming you use variable number of extra bytes.
索引ivar虽然功能强大,但有两点需要注意。首先,class_createInstance不能在ARC下使用,因此您必须使用-fno-objc-arc标志编译类的某些部分,以使其发光。其次,运行时不会将索引ivar大小信息保存在任何地方。即使dealloc会清理所有东西(因为它在内部调用free),您也应该保留存储大小,假设您使用可变数量的额外字节。
Looking for Key and Fetching Object 寻找键和取回对象
Analyzing Assembly 分析组装
Although at this point we could poke the __NSDictionaryI instances to figure out how they work, the ultimate truth lies within the assembly. Instead of going through the entire wall of ARM64 we will discuss the equivalent Objective-C code instead.
虽然此时我们可以戳__NSDictionaryI实例以了解它们如何工作,但最终的真相在程序集中。我们将讨论等价的Objective-C代码,而不是整个ARM64。
The class itself implements very few methods, but I claim the most important is objectForKey: – this is what we’re going to discuss in more detail. Since I made the assembly analysis anyway, you can read it on a separate page. It’s dense, but the thorough pass should convince you the following code is more or less correct.
类本身实现的方法很少,但我认为最重要的是objectForKey: -这是我们将更详细讨论的内容。因为我已经做了汇编分析,所以您可以在单独的页面上阅读它。它很密集,但是完整的传递会让您相信下面的代码或多或少是正确的。
The C Code C代码
Unfortunately, I don’t have access to the Apple’s code base, so the reverse-engineered code below is not identical to the original implementation. On the other hand, it seems to be working well and I’ve yet to find an edge case that behaves differently in comparison to the genuine method. 遗憾的是,我无法访问苹果的代码库,因此下面的反向工程代码与最初的实现并不相同。另一方面,它似乎工作得很好,而且我还没有找到一个边界情况,它的行为与真正的方法不同。
The following code is written from the perspective of __NSDictionaryI class:
以下代码是从__NSDictionaryI类的角度编写的:
- (id)objectForKey:(id)aKey
{
NSUInteger sizeIndex = _szidx;
NSUInteger size = __NSDictionarySizes[sizeIndex];
id *storage = (id *)object_getIndexedIvars(dict);
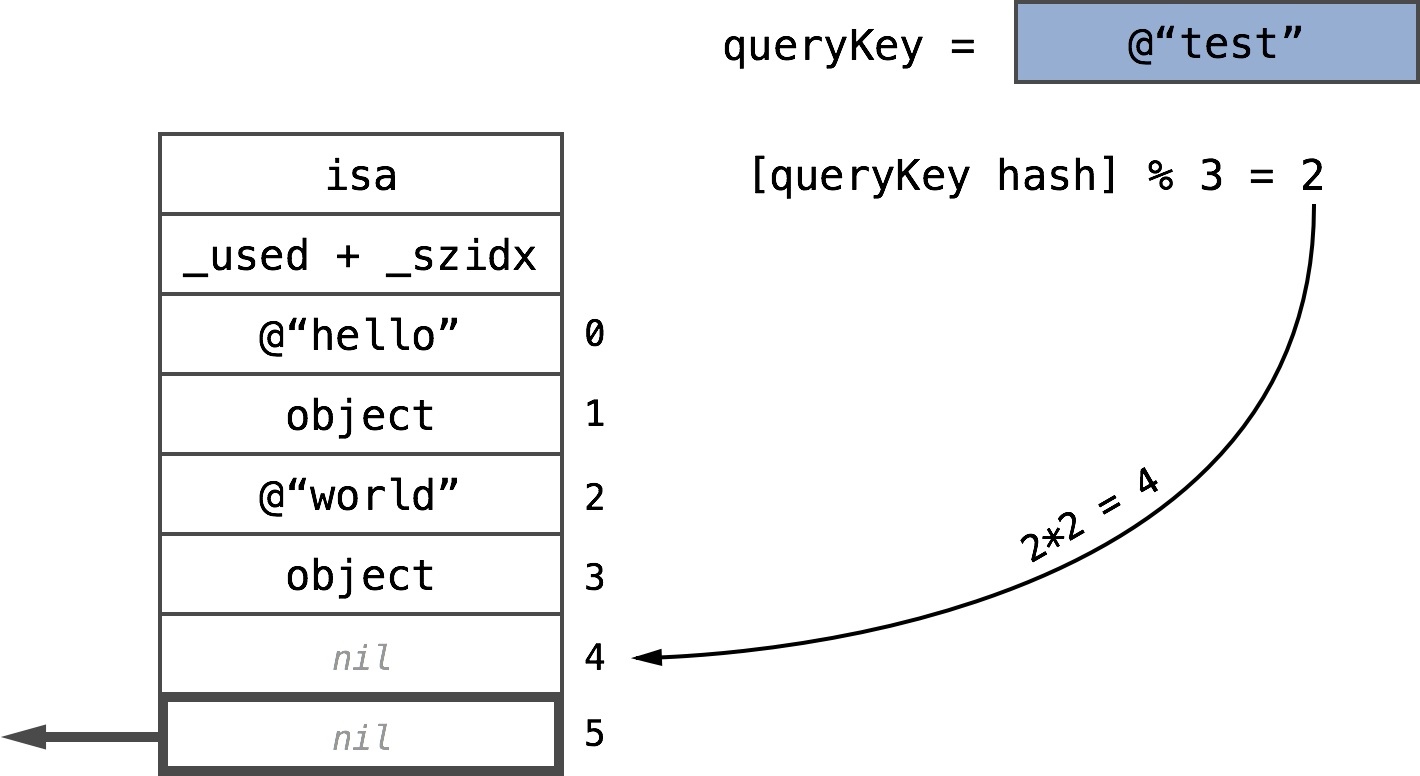
NSUInteger fetchIndex = [aKey hash] % size;
for (int i = 0; i < size; i++) {
id fetchedKey = storage[2 * fetchIndex];
if (fetchedKey == nil) {
return nil;
}
if (fetchedKey == aKey || [fetchedKey isEqual:aKey]) {
return storage[2 * fetchIndex + 1];
}
fetchIndex++;
if (fetchIndex == size) {
fetchIndex = 0;
}
}
return nil;
}
When you take a closer look at the C code you might notice something strange about key fetching. It’s always taken from even offsets, while the returned object is at the very next index. This is the dead giveaway of __NSDictionaryI’s internal storage: it keeps keys and objects alternately:
当您仔细查看C代码时,您可能会注意到键获取的一些奇怪之处。它总是取偶数偏移量,而返回的对象位于下一个索引处。这是__NSDictionaryI内部存储的致命漏洞:它交替保存键和对象:
 Keys and objects are stored alternately
Update: Joan Lluch provided a very convincing explanation for this layout. The original code could use an array of very simple structs: 更新:Joan Lluch对这种布局给出了非常有说服力的解释。原始代码可以使用一个非常简单的结构数组:
struct KeyObjectPair {
    id key;
    id object;
};
The objectForKey: method is very straightforward and I highly encourage you to walk through it in your head. It’s nonetheless worth pointing out a few things. First of all, the _szidx ivar is used as an index into the __NSDictionarySizes array, thus it most likely stands for “size index”.
objectForKey:方法非常简单,我强烈建议您在脑海中仔细研究它。尽管如此,有几点值得指出。首先,_szidx ivar用作__nsdictionarysize数组的索引,因此它很可能代表“size索引”。
Secondly, the only method called on the passed key is hash. The reminder of dividing key’s hash value by dictionary’s size is used to calculate the offset into the index ivars section.
其次,对传递的键调用的唯一方法是哈希。提醒键的哈希值除以字典的大小用于计算索引ivars部分的偏移量。
If the key at the offset is nil, we simply return nil, the job is done:
如果键在偏移量为nil,我们只需返回nil,工作就完成了:
 When the key slot is empty, nil is returned
However, if the key at the offset is non nil, then the two cases may occur. If the keys are equal, then we return the adjacent object. If they’re not equal then the hash collision occurred and we have to keep looking further. __NSDictionaryI simply keeps looking until either match or nil is found:
但是,如果在偏移量处的键不是nil,则可能出现这两种情况。如果键值相等,则返回相邻的对象。如果它们不相等,就会发生哈希冲突,我们必须继续看下去。__nsdictionari只是继续查找,直到找到匹配或nil:
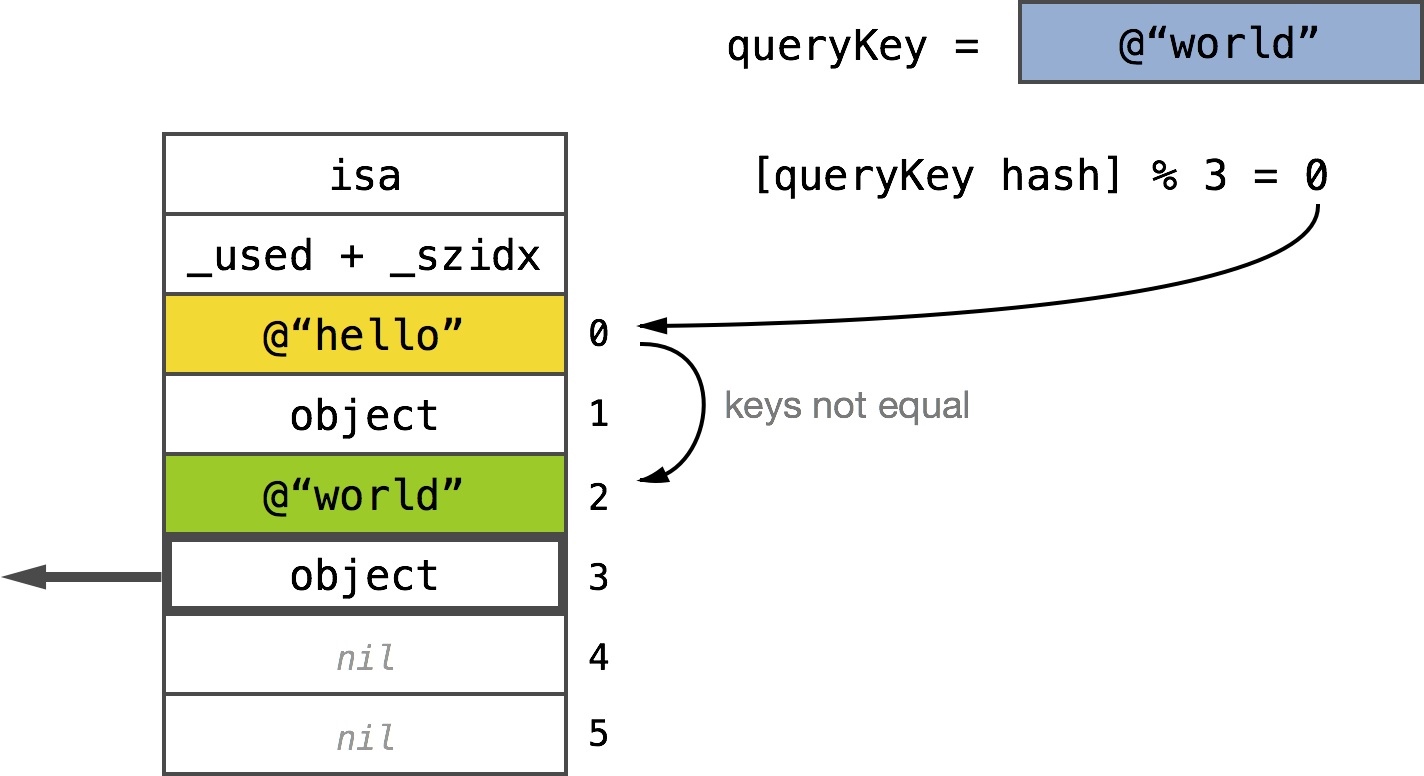 Key found after one collision
This kind of searching is known as linear probing. Notice how __NSDictionaryI wraps the fetchIndex around when the storage end is hit. The for loop is there to limit the number of checks – if the storage was full and the loop condition was missing we’d keep looking forever.
这种搜索被称为线性探测。注意__NSDictionaryI在到达存储端时如何包装fetchIndex。for循环用于限制检查的数量——如果存储已满且缺少循环条件,我们将一直寻找下去。
####__NSDictionarySizes & __NSDictionaryCapacities
We already know __NSDictionarySizes is some kind of array that stores different possible sizes of __NSDictionaryI. We can reason that it’s an array of NSUIntegers and indeed, if we ask Hopper to treat the values as 64-bit unsigned integers it suddenly makes a lot of sense:
我们已经知道__nsdictionarysize是某种数组,它存储不同大小的__NSDictionaryI。我们可以推断它是一个NSUIntegers数组,实际上,如果我们要求Hopper将这些值作为64位无符号整数来处理,它会突然变得很有意义:
___NSDictionarySizes:
0x00000000001577a8         dq         0x0000000000000000
0x00000000001577b0         dq         0x0000000000000003
0x00000000001577b8         dq         0x0000000000000007
0x00000000001577c0         dq         0x000000000000000d
0x00000000001577c8         dq         0x0000000000000017
0x00000000001577d0         dq         0x0000000000000029
0x00000000001577d8         dq         0x0000000000000047
0x00000000001577e0         dq         0x000000000000007f
...
In a more familiar decimal form it presents as a beautiful list of 64 primes starting with the following sequence: 0, 3, 7, 13, 23, 41, 71, 127. Notice, that those are not consecutive primes which begs the question: what’s the average ratio of the two neighboring numbers? It’s actually around 1.637 – a very close match to the 1.625 which was the growth factor for NSMutableArray. For details of why primes are used for the storage size this Stack Overflow answer is a good start.
在一个更熟悉的十进制形式中,它表示一个由64个素数组成的漂亮列表,从以下序列开始:0、3、7、13、23、41、71、127。注意,这些不是连续的质数这就引出了一个问题相邻两个数的平均比率是多少?它实际上是在1.637左右,与NSMutableArray的生长因子1.625非常接近。关于为什么将素数用于存储大小的详细信息,这个堆栈溢出答案是一个很好的开始。
We already know how much storage can __NSDictionaryI have, but how does it know which size index to pick on initialization? The answer lies within the previously mentioned + __new::::: class method. Converting some parts of the assembly back to C renders the following code:
我们已经知道__NSDictionaryI可以有多少存储,但是它如何知道在初始化时选择哪个大小的索引呢?答案就在前面提到的+ __new:::: class方法中。将程序集的某些部分转换回C语言将呈现以下代码:
int szidx;
for (szidx = 0; szidx < 64; szidx++) {
    if (__NSDictionaryCapacities[szidx] >= count) {
        break;
    }
}

if (szidx == 64) {
    goto fail;
}
The method looks linearly through __NSDictionaryCapacities array until count fits into the size. A quick glance in Hopper shows the contents of the array:
该方法通过__nsdictionarycapacity数组线性查找,直到count符合该大小。Hopper中快速扫一眼,数组内容如下:
___NSDictionaryCapacities:
0x00000000001579b0         dq         0x0000000000000000
0x00000000001579b8         dq         0x0000000000000003
0x00000000001579c0         dq         0x0000000000000006
0x00000000001579c8         dq         0x000000000000000b
0x00000000001579d0         dq         0x0000000000000013
0x00000000001579d8         dq         0x0000000000000020
0x00000000001579e0         dq         0x0000000000000034
0x00000000001579e8         dq         0x0000000000000055
...
Converting to base-10 provides 0, 3, 6, 11, 19, 32, 52, 85 and so on. Notice that those are smaller numbers than the primes listed before. If you were to fit 32 key-value pairs into __NSDictionaryI it will allocate space for 41 pairs, conservatively saving quite a few empty slots. This helps reducing the number of hash collisions, keeping the fetching time as close to constant as possible. Apart from trivial case of 3 elements, __NSDictionaryI will never have its storage full, on average filling at most 62% of its space.
转换到base-10提供0、3、6、11、19、32、52、85等等。注意,这些数比前面列出的素数要小。如果将32个键-值对放入__NSDictionaryI,它将为41对键-值对分配空间,保守地节省了相当多的空槽。这有助于减少哈希冲突的次数,使获取时间尽可能接近于常量。除了3个元素的简单情况外,__NSDictionaryI的存储永远不会满,平均最多填充62%的空间。
As a trivia, the last nonempty value of __NSDictionaryCapacities is 0x11089481C742 which is 18728548943682 in base-10. You’d have to try really hard not to fit in within the pairs count limit, at least on 64-bit architecture.
作为一个琐事,__nsdictionarycapacity的最后一个非空值是0x11089481C742,在base-10中是18728548943682。至少在64位体系结构上,您必须非常努力地不符合对计数的限制。
Non Exported Symbols 非出口标志
If you were to use __NSDictionarySizes in your code by declaring it as an extern array, you’d quickly realize it’s not that easy. The code wouldn’t compile due to a linker error – the __NSDictionarySizes symbol is undefined. Inspecting the CoreFoundation library with nm utility:
如果在代码中通过声明__nsdictionarysize为一个extern数组来使用__nsdictionarysize,您很快就会意识到这并不容易。由于链接器错误,代码无法编译—__nsdictionarysize符号未定义。使用nm工具检查CoreFoundation库:
nm CoreFoundation | grep ___NSDictionarySizes
…clearly shows the symbols are there (for ARMv7, ARMv7s and ARM64 respectively): ……清楚地显示了符号的存在(分别为ARMv7、ARMv7s和ARM64):
00139c80 s ___NSDictionarySizes
0013ac80 s ___NSDictionarySizes
0000000000156f38 s ___NSDictionarySizes
Unfortunately the nm manual clearly states: 不幸的是,nm手册明确规定:
If the symbol is local (non-external), the symbol’s type is instead represented by the corresponding lowercase letter. 如果符号是本地的(非外部的),则符号的类型由相应的小写字母表示。
The symbols for __NSDictionarySizes are simply not exported – they’re intended for internal use of the library. I’ve done some research to figure out if it’s possible to link with non-exported symbols, but apparently it is not (please tell me if it is!). We can’t access them. That is to say, we can’t access them easily.
__nsdictionarysize的符号并不导出——它们是用于库的内部使用的。我做了一些研究,想知道是否可以链接到非导出的符号,但显然不可能(请告诉我是否可以!)我们无法访问它们。也就是说,我们无法轻易地访问它们。
####Sneaking in 偷偷在
Here’s an interesting observation: in both iOS 7.0 an 7.1 the kCFAbsoluteTimeIntervalSince1904 constant is laid out directly before __NSDictionarySizes:
这里有一个有趣的观察:在iOS 7.0和7.1中,kCFAbsoluteTimeIntervalSince1904常量在__nsdictionarysize之前直接列出:
_kCFAbsoluteTimeIntervalSince1904:
0x00000000001577a0         dq         0x41e6ceaf20000000
___NSDictionarySizes:
0x00000000001577a8         dq         0x0000000000000000
The best thing about kCFAbsoluteTimeIntervalSince1904 is that it is exported! We’re going to add 8 bytes (size of double) to the address of this constant and reinterpret the result as pointer to NSUInteger:
自1904年以来,kcfabsolutetimeintervalvalis最好的一点就是它是出口的!我们将在这个常量的地址上增加8字节(双倍大小),并将结果重新解释为指向NSUInteger的指针:
NSUInteger *Explored__NSDictionarySizes = (NSUInteger *)((char *)&kCFAbsoluteTimeIntervalSince1904 + 8);
Then we can access its values by convenient indexing: 然后我们可以通过方便的索引来访问它的值:
(lldb) p Explored__NSDictionarySizes[0]
(NSUInteger) $0 = 0
(lldb) p Explored__NSDictionarySizes[1]
(NSUInteger) $1 = 3
(lldb) p Explored__NSDictionarySizes[2]
(NSUInteger) $2 = 7
This hack is very fragile and will most likely break in the future, but this is the test project so it’s perfectly fine. 这个黑客是非常脆弱的,很可能会在未来崩溃,但这是测试项目,所以它是完美的。
__NSDictionaryI Characteristics __NSDictionaryI特点
Now that we’ve discovered the internal structure of __NSDictionaryI we can use this information to figure out why things work they way they work and what unforeseen consequences does the present implementation of __NSDictionaryI introduce.
既然我们已经发现了__NSDictionaryI的内部结构,我们就可以使用这些信息来弄清楚为什么事情以它们的方式工作,以及当前的__NSDictionaryI实现会带来哪些无法预料的后果。
Printout Code 打印输出的代码
To make our investigation a little bit easier we will create a helper NSDictionary category method that will print the contents of the instance
为了让我们的研究更简单,我们将创建一个helper NSDictionary category方法,它将打印实例的内容
- (NSString *)explored_description
{
    assert([NSStringFromClass([self class]) isEqualToString:@"__NSDictionaryI"]);

    BCExploredDictionary *dict = (BCExploredDictionary *)self;

    NSUInteger count = dict->_used;
    NSUInteger sizeIndex = dict->_szidx;
    NSUInteger size = Explored__NSDictionarySizes[sizeIndex];

    __unsafe_unretained id *storage = (__unsafe_unretained id *)object_getIndexedIvars(dict);

    NSMutableString *description = [NSMutableString stringWithString:@"\n"];

    [description appendFormat:@"Count: %lu\n", (unsigned long)count];
    [description appendFormat:@"Size index: %lu\n", (unsigned long)sizeIndex];
    [description appendFormat:@"Size: %lu\n", (unsigned long)size];

    for (int i = 0; i < size; i++) {
        [description appendFormat:@"[%d] %@ - %@\n", i, [storage[2*i] description], [storage[2*i + 1] description]];
    }

    return description;
}
Order of keys/objects on enumeration is the same as order of keys/objects in storage
枚举中的键/对象的顺序与存储中的键/对象的顺序相同
Let’s create a simple dictionary containing four values: 让我们创建一个包含四个值的简单字典:
NSDictionary *dict = @{@1 : @"Value 1",
                       @2 : @"Value 2",
                       @3 : @"Value 3",
                       @4 : @"Value 4"};

NSLog(@"%@", [dict explored_description]);
The output of the explored description is: 所探究的描述的输出为:
Count: 4
Size index: 2
Size: 7
[0] (null) - (null)
[1] 3 - Value 3
[2] (null) - (null)
[3] 2 - Value 2
[4] (null) - (null)
[5] 1 - Value 1
[6] 4 - Value 4
With that in mind let’s do a quick enumeration over dictionary: 考虑到这一点,让我们做一个快速枚举字典:
[dict enumerateKeysAndObjectsUsingBlock:^(id key, id obj, BOOL *stop) {
    NSLog(@"%@ - %@", key, obj);
}];
And the output: 和输出:
3 - Value 3
2 - Value 2
1 - Value 1
4 - Value 4
Enumeration seems to simply walk through the storage, ignoring the nil keys and calling the block only for non-empty slots. This is also the case for fast enumeration, keyEnumerator, allKeys and allValues methods. It makes perfect sense. The NSDictionary is not ordered, so it doesn’t really matter in what sequence the keys and values are provided. Using the internal layout is the easiest and probably the fastest option.
枚举似乎只是遍历存储,忽略nil键,只对非空槽调用块。这也是快速枚举、键枚举器、allKeys和allValues方法的情况。这完全说得通。NSDictionary不是有序的,所以键和值的顺序并不重要。使用内部布局是最简单也是最快的选择。
If you mess up, __NSDictionaryI may return something for nil key! 如果你搞砸了,__nsdictionari可能返回nil key!
Let’s consider an example. Imagine we’re building a simple 3D strategy game set in space. The entire universe is split into cube-like sectors that imaginary factions can fight over. A sector can be referenced by its i, j and k indexes. We shouldn’t use a 3D array to store the sectors info – the game space is huge and most of it is empty, so we would waste memory storing nil pointers. Instead, we’re going to use a sparse storage in a form of NSDictionary with a custom key class that will make it super easy to query if there is something at a given location.
让我们考虑一个例子。假设我们正在构建一个简单的3D策略游戏。整个宇宙被分裂成类似立方体的区域,想象中的派系可以为之战斗。扇区可以被它的i、j和k索引引用。我们不应该使用3D数组来存储扇区信息——游戏空间很大,而且大部分都是空的,所以我们会浪费内存来存储nil指针。相反,我们将以NSDictionary的形式使用一个稀疏存储,并带有一个自定义键类,它将使查询给定位置上是否有东西变得超级容易。
Here’s the interface for key, a BC3DIndex class:
这是key的接口,一个BC3DIndex类:
@interface BC3DIndex : NSObject <NSCopying>

@property (nonatomic, readonly) NSUInteger i, j, k; // you actually can do that

- (instancetype)initWithI:(NSUInteger)i j:(NSUInteger)j k:(NSUInteger)k;

@end
And its equally trivial implementation: 以及它同样微不足道的实现:
@implementation BC3DIndex

- (instancetype)initWithI:(NSUInteger)i j:(NSUInteger)j k:(NSUInteger)k
{
    self = [super init];
    if (self) {
        _i = i;
        _j = j;
        _k = k;
    }
    return self;
}

- (BOOL)isEqual:(BC3DIndex *)other
{
    return other.i == _i && other.j == _j && other.k == _k;
}

- (NSUInteger)hash
{
    return _i ^ _j ^ _k;
}

- (id)copyWithZone:(NSZone *)zone
{
    return self; // we're immutable so it's OK
}

@end
Notice how we’re being a good subclassing citizen: we implemented both isEqual: and hash methods and made sure that if two 3D-indexes are equal then their hash values are equal as well. The object equality requirements are fulfilled.
注意我们是如何成为一个优秀的子类公民的:我们实现了isEqual:和hash方法,并确保如果两个3d索引相等,那么它们的hash值也相等。满足了对象相等的要求。
Here’s a trivia: what will the following code print? 这里有一个小问题:下面的代码将打印什么?
NSDictionary *indexes = @{[[BC3DIndex alloc] initWithI:2 j:8 k:5] : @"A black hole!",
                          [[BC3DIndex alloc] initWithI:0 j:0 k:0] : @"Asteroids!",
                          [[BC3DIndex alloc] initWithI:4 j:3 k:4] : @"A planet!"};

NSLog(@"%@", [indexes objectForKey:nil]);
It should be (null) right? Nope:
应该是(null)对吧?不:
Asteroids!
To investigate this further let’s grab a dictionary’s description: 为了进一步研究这个问题,让我们获取一个字典的描述:
Count: 3
Size index: 1
Size: 3
[0] <BC3DIndex: 0x17803d340> - A black hole!
[1] <BC3DIndex: 0x17803d360> - Asteroids!
[2] <BC3DIndex: 0x17803d380> - A planet!
It turns out __NSDictionaryI doesn’t check if the key passed into objectForKey: is nil (and I’d argue this is a good design decision). Calling hash method on nil returns 0, which causes the class to compare key at index 0 with nil. This is important: it is the stored key that executes the isEqual: method, not the passed in key.
结果是__nsdictionari不检查传递给objectForKey:的键是否为nil(我认为这是一个很好的设计决策)。在nil上调用hash方法将返回0,这将导致类将索引0处的key与nil进行比较。这一点很重要:执行isEqual:方法的是存储的键,而不是传入的键。
The first comparison fails, since i index for “A black hole!” is 2 whereas for nil it’s zero. The keys are not equal which causes the dictionary to keep looking, hitting another stored key: the one for “Asteroids!”. This key has all three i, j, and k properties equal to 0 which is also what nil will return when asked for its properties (by the means of nil check inside objc_msgSend).
第一个比较失败了,因为我索引了“一个黑洞!””是2,而nil是0。这两个键是不相等的,这导致字典继续查找,并命中另一个存储的键:“小行星!”这个键具有所有三个i、j和k属性,这些属性都等于0,这也是nil在请求它的属性时返回的值(通过objc_msgSend中的nil检查)。
This is the crux of the problem. The isEqual: implementation of BC3DIndex may, under some conditions, return YES for nil comparison. As you can see, this is a very dangerous behavior that can mess things up easily. Always ensure that your object is not equal to nil.
这是问题的症结所在。isEqual:在某些条件下,BC3DIndex的实现对于nil比较可能返回YES。如你所见,这是一种非常危险的行为,很容易把事情搞砸。始终确保对象不等于nil。
A Helper Key Class 辅助键类
For the next two tests we’re going to craft a special key class that will have a configurable hash value and will print stuff to the console when executing hash and isEqual: method.
在接下来的两个测试中,我们将创建一个特殊的键类,它将具有可配置的散列值,并在执行散列和isEqual:方法时将内容打印到控制台。
Here’s the interface: 这是接口:
@interface BCNastyKey : NSObject <NSCopying>

@property (nonatomic, readonly) NSUInteger hashValue;

+ (instancetype)keyWithHashValue:(NSUInteger)hashValue;

@end
And the implementation:
@implementation BCNastyKey

+ (instancetype)keyWithHashValue:(NSUInteger)hashValue
{
    return [[BCNastyKey alloc] initWithHashValue:hashValue];
}

- (instancetype)initWithHashValue:(NSUInteger)hashValue
{
    self = [super init];
    if (self) {
        _hashValue = hashValue;
    }
    return self;
}

- (id)copyWithZone:(NSZone *)zone
{
    return self;
}

- (NSUInteger)hash
{
    NSLog(@"Key %@ is asked for its hash", [self description]);

    return _hashValue;
}

- (BOOL)isEqual:(BCNastyKey *)object
{
    NSLog(@"Key %@ equality test with %@: %@", [self description], [object description], object == self ? @"YES" : @"NO");

    return object == self;
}

- (NSString *)description
{
    return [NSString stringWithFormat:@"(&:%p #:%lu)", self, (unsigned long)_hashValue];
}

@end
This key is awful: we’re only equal to self, but we’re returning an arbitrary hash. Notice that this doesn’t break the equality contract. 这个键很糟糕:我们只等于self,但我们返回的是一个任意哈希。注意,这并没有违反平等契约。
isEqual doesn’t have to be called to match the key 不需要调用isEqual来匹配键
Let’s create a key and a dictionary: 让我们创建一个键和一个字典:
BCNastyKey *key = [BCNastyKey keyWithHashValue:3];
NSDictionary *dict = @{key : @"Hello there!"};
The following call: 以下电话:
[dict objectForKey:key];
Prints this to the console: 打印到控制台:
Key (&:0x17800e240 #:3) is asked for its hash
As you can see, the isEqual: method has not been called. This is very cool! Since the vast majority of keys out there are NSString literals, they share the same address in the entire application. Even if the key is a very long literal string, the __NSDictionaryI won’t run the potentially time consuming isEqual: method unless it absolutely has to. And since 64-bit architectures introduced tagged pointers, some instances of NSNumber, NSDate and, apparently, NSIndexPath benefit from this optimization as well.
如您所见,还没有调用isEqual:方法。这太酷了!由于绝大多数键都是NSString文字,它们在整个应用程序中共享同一个地址。即使键是一个很长的文字字符串,__NSDictionaryI也不会运行可能会耗费时间的isEqual:方法,除非绝对需要。由于64位架构引入了带标记的指针,NSNumber、NSDate和NSIndexPath的一些实例显然也受益于这种优化。
Worst case performance is linear 最坏的情况是线性的
Let’s create a very simple test case: 让我们创建一个非常简单的测试用例:
BCNastyKey *targetKey = [BCNastyKey keyWithHashValue:36];

NSDictionary *b = @{[BCNastyKey keyWithHashValue:1] : @1,
                    [BCNastyKey keyWithHashValue:8] : @2,
                    [BCNastyKey keyWithHashValue:15] : @3,
                    [BCNastyKey keyWithHashValue:22] : @4,
                    [BCNastyKey keyWithHashValue:29] : @5,
                    targetKey : @6
                    };
A single killer line: 一条简单的杀手锏:
NSLog(@"Result: %@", [[b objectForKey:targetKey] description]);
Reveals the disaster: 揭示了灾难:
Key (&:0x170017640 #:36) is asked for its hash
Key (&:0x170017670 #:1) equality test with (&:0x170017640 #:36): NO
Key (&:0x170017660 #:8) equality test with (&:0x170017640 #:36): NO
Key (&:0x170017680 #:15) equality test with (&:0x170017640 #:36): NO
Key (&:0x1700176e0 #:22) equality test with (&:0x170017640 #:36): NO
Key (&:0x170017760 #:29) equality test with (&:0x170017640 #:36): NO
Result: 6
This is extremely pathological case – every single key in the dictionary has ben equality tested. Even though each hash was different, it still collided with every other key, because the keys’ hashes were congruent modulo 7, which turned out to be the storage size of the dictionary. 这是一个极其病态的案例——字典里的每一个键都经过了ben等式的检验。尽管每个散列是不同的,但它仍然与其他键冲突,因为键的散列是模7,也就是字典的存储大小。
As mentioned before, notice that the last isEqual: test is missing. The __NSDictionaryI simply compared the pointers and figured out it must be the same key.
如前所述,注意最后一个isEqual: test丢失了。__nsdictionari简单地比较了指针,发现它们一定是相同的键。
Should you care for this linear time fetching? Absolutely not. I’m not that into probabilistic analysis of hash distribution, but you’d have to be extremely lucky for all your hashes to be modulo congruent to dictionary’s size. Some collisions here and there will always happen, this is the nature of hash tables, but you will probably never run into the linear time issue. That is, unless you mess up your hash function.
您应该关心这个线性时间获取吗?绝对不是。我不是很喜欢哈希分布的概率分析,但你必须非常幸运你所有的哈希都能和字典的大小保持模一致。这里和那里总会发生一些碰撞,这是哈希表的本质,但你可能永远不会遇到线性时间问题。除非你搞砸了哈希函数。
Final Words 最后的话
I’m fascinated how simple the __NSDictionaryI turned out to be. Needless to say, the class certainly serves its purpose and there’s no need to make things excessively complex. For me, the most beautiful aspect of the implementation is the key-object-key-object layout. This is a brilliant idea.
我很感兴趣的是,我发现这本词典竟然如此简单。不用说,这个类当然满足了它的目的,没有必要把事情弄得过于复杂。对我来说,该实现最漂亮的方面是键-对象-键-对象布局。这是个好主意。
If you were to take one tip from this article then I’d go with watching out for your hash and isEqual: methods. Granted, one rarely writes custom key classes to be used in a dictionary, but those rules apply to NSSet as well.
如果您要从本文中获得一个提示,那么我建议您注意hash和isEqual: methods。诚然,很少有人会编写自定义键类来在字典中使用,但这些规则也适用于NSSet。
I’m aware that at some point in time NSDictionary will change and my findings will become obsolete. Internalizing the current implementation details may become a burden in the future, when the memorized assumptions will no longer apply. However, right here and right now it’s just so much fun to see how things work and hopefully you share my excitement.
我知道在某个时候NSDictionary会改变,我的发现也会过时。当记住的假设不再适用时,将当前实现细节内部化可能成为未来的负担。然而,就在此时此地,看到事情是如何运作的,真的很有趣,希望你能分享我的兴奋。
原文: https://ciechanow.ski/exposing-nsdictionary/