ARTS是
由左耳朵耗子--陈皓发起的一个活动: 每周至少做一个Leetcode的算法题、阅读并点评至少一篇英文技术文章、学习至少一个技术技巧、分享一篇有观点和思考的文章。(也就是Algorithm、Review、Tip、Share简称ARTS),至少坚持一年。
ARTS 014
这是第14篇
Algorihm 算法题
290. Word Pattern
Difficulty: Easy
Given a pattern and a string str, find if str follows the same pattern.
Here follow means a full match, such that there is a bijection between a letter in pattern and a non-empty word in str.
Example 1:
**Input:** pattern = `"abba"`, str = `"dog cat cat dog"`
**Output:** true```

**Example 2:**
Input:pattern = "abba", str = "dog cat cat fish"
Output: false```
Example 3:
**Input:** pattern = `"aaaa"`, str = `"dog cat cat dog"`
**Output:** false```

**Example 4:**
Input: pattern = "abba", str = "dog dog dog dog"
Output: false```
Notes:
You may assume pattern contains only lowercase letters, and str contains lowercase letters separated by a single space.
Solution
Language: C
刚看到这算法的时候,感觉可以用字典解决,但是C语言中基础数据类型中没有字典,又想不到简单的方法,,就看了几个答案,然后两天之后,根据自己的理解,又实现了一遍,刚开始的算法如下:
bool wordPattern0(char* pattern, char* str) {
    int str_len = strlen(str);
    int pattern_len = strlen(pattern);
    char buffer[str_len + 1];
    strcpy(buffer, str);

    char *s = strtok(buffer, " ");
    char *tables[26] ;
    memset(tables, '\0', 26 * sizeof(char *));
    int i =0;
    for (; s; s = strtok(NULL, " ")) {
        if (i>=pattern_len) {
            return false;
        }
        char aa = pattern[i];
        char *s1 = tables[aa - 'a'];

        if (!s1) {
            tables[aa - 'a'] = s;
        }
        else{
            if (strcmp(s, s1)) {
                 return false;
            }
        }
        i++;
    }

    if (i!=pattern_len) {
        return false;
    }
    return true;
}
运行之后发现有测试用例过不去,比如: 当char* pattern = “abba”; char* str = “dog dog dog dog”;
本来以为已经理解了别人的算法了,结果自己实现起来还是出错了,还是不能一部到位,分析了一下原因:
又读了一遍题目要求,这时才注意到,pattern和str是应该是一对一的关系,而我的实现是一对多的关系,字典就是一对多的关系,就是我的实现只能保证 对于pattern的不同位置的相同字母,只能保证在对应str的同一位置的单词也是相同的,比如pattern中第一个a对应dog,第4个a也应该对应dog;却不能保证,对于str的不同位置的相同单词,只能有一个pattern字符与之对应,改进后的实现如下:
bool wordPattern0(char* pattern, char* str) {
    int str_len = strlen(str);
    int pattern_len = strlen(pattern);
    char buffer[str_len + 1];
    strcpy(buffer, str);

    char *s = strtok(buffer, " ");
    char *tables[26] ;
    memset(tables, '\0', 26 * sizeof(char *));
    int i =0;
    for (; s; s = strtok(NULL, " ")) {
        if (i>=pattern_len) {
            return false;
        }
        char aa = pattern[i];
        char *s1 = tables[aa - 'a'];

        if (!s1) {
            tables[aa - 'a'] = s;
        }
        else{
            if (strcmp(s, s1)) {
                 return false;
            }
        }
        i++;
    }

    if (i!=pattern_len) {
        return false;
    }

    for (int i =0; i<26; i++) {
        if (!tables[i]) {
            continue;
        }
        for (int j =i+1; j<26; j++) {
            if (!tables[j]) {
                continue;
            }
            if (!strcmp(tables[i], tables[j])) {
                return false;
            }
        }
    }

    return true;
}
其实就是加了一一对应的判断
for (int i =0; i<26; i++) {
        if (!tables[i]) {
            continue;
        }
        for (int j =i+1; j<26; j++) {
            if (!tables[j]) {
                continue;
            }
            if (!strcmp(tables[i], tables[j])) {
                return false;
            }
        }
    }
一下几个实现很值得学习:
实现1 ,这是我看的第一个实现,所以我的实现和他很像,但是也有不同的地方,这个算法是在str中的单词加入之前table之前,先做判断,如果str中的单词已经存在于table中,直接返回false,而我的实现先把str中的单词加入table中,最后再比较。
bool wordPattern(char* pattern, char* str) {
    int str_len = strlen(str);
    char buffer[str_len + 1];
    strcpy(buffer, str);

    char *p = pattern;
    char *s = strtok(buffer, " ");

    char *table[26];
    memset(table, '\0', 26 * sizeof(char *));

    do {
        if (*p == '\0') return false;
        int input = *p++ - 'a';

        if (table[input] == NULL) {
           ////加入table之前先判断table中是否已经存在,如果存在直接返回false
            for (int i = 0; i < 26; i++) {
                if (table[i] == NULL)
                    continue;
                if (strcmp(table[i], s) == 0)
                    return false;
            }

            table[input] = (char *) malloc((strlen(s) + 1) * sizeof(char));
            strcpy(table[input], s);
        } else {
            if (strcmp(table[input], s))
                return false;
        }

        s = strtok(NULL, " ");
    } while (s != NULL);

    for (int i = 0; i < 26; i++)
        free(table[i]);

    if (*p != '\0')
        return false;
    return true;
}
实现2 ,这个实现其实和上一个算法一模一样,不同的是table中装的不再是str中的单词,而是hash值,而且这个hash算法也比较简单,就是把单词转为整数。
bool wordPattern(char* pattern, char* str)
{
    unsigned int table[26] = {0};

    for (; *pattern && *str; pattern++) {
        unsigned int hash = 2139062143;

        for(; *str && *str != ' '; str++)
            hash = 37 * hash + *str;

        if (*str)
            str++;

        if (!table[*pattern - 'a']) {
          ////加入table之前先判断table中是否已经存在,如果存在直接返回false
            for (int i = 0; i < 26; ++i)
                if (table[i] == hash)
                    return false;
            table[*pattern - 'a'] = hash;
        } else
            if (table[*pattern - 'a'] != hash)
                return false;
    }

    return !*str && !*pattern;
}
实现3,这个实现稍微复杂一点,主要是没有使用strtok函数,自己实现了
bool wordPattern2(char* pattern, char* str) {
    int patternLength = strlen(pattern);
    int tokens = 0;
    for (int i = 0; str[i] != 0; i++) {
        if (str[i] == ' ') {
            tokens++;
        }
    }
    tokens++;
    if (patternLength != tokens) {
        return false;
    }
    char *dict[26];
    for (int i = 0; i < 26; i++) {
        dict[i] = NULL;
    }
    for (int i = 0; pattern[i] != 0; i++) {
        int size = 0;
        int capacity = 8;
        char *ithTok = malloc(sizeof(char) * 8);
        int spacesToSkip = i;
        char *stringPointer = str;
        while (spacesToSkip) {
            if (*stringPointer == ' ') {
                spacesToSkip--;
            }
            stringPointer++;
        }
        //这个for循环相当于strtok函数,取出str中的单词
        for (int i = 0; stringPointer[i] != ' ' && stringPointer[i] != 0; i++) {
            ithTok[i] = stringPointer[i];
            size++;
            if (size >= capacity) {
                ithTok = realloc(ithTok, sizeof(char) * capacity * 2);
                capacity *= 2;
            }
        }

        //下面的判断和上面两个算法一样
        ithTok[size] = 0;
        if (dict[pattern[i] - 'a'] == NULL) {
           ////加入table之前先判断table中是否已经存在,如果存在直接返回false
            for (int j = 0; j < 26; j++) {
                if (dict[j] != NULL) {
                    if (strcmp(dict[j], ithTok) == 0) {
                        return false;
                    }
                }
            }
            dict[pattern[i] - 'a'] = ithTok;
        }
        else {
            if (strcmp(dict[pattern[i] - 'a'], ithTok) != 0) {
                return false;
            }
        }
    }
    return true;
}
实现四:这个实现一直没想的很明白,虽然在LeetCode可以运行通过,但是觉得会有hash碰撞的问题
#define alphabetSIZE 26  //a~z 26 letters
#define hashtableSIZE 3533  //randomly choose a large prime number
struct Node{
    int count;
    char *str;
    struct Node *next;
};
void initialize_hashtable(struct Node *hashtable)
{
    int i;
    for(i=0;i<hashtableSIZE;i++)
    {
        hashtable[i].count = 0;
        hashtable[i].next = NULL;
    }
}

long hash (char *str)
{
    int c;
    unsigned long hash = 0;
    while(c = *str++)
        hash = (hash<<5) + hash + c;
    return hash%hashtableSIZE;
}

void hashtable_free(struct Node *hashtable)
{
    int i;
    for(i=0;i<hashtableSIZE;i++)
    {
        struct Node *tail = hashtable[i].next;
        while(tail)
        {
            struct Node *temp = tail;
            tail = tail->next;
            free(temp);
        }
    }
    free(hashtable);
}

bool wordPattern(char* pattern, char* str) {
    int alphabet[alphabetSIZE]={0},i,patternSize = strlen(pattern);
    struct Node *hashtable = (struct Node *)malloc(sizeof(struct Node)*hashtableSIZE);
    initialize_hashtable(hashtable);
    struct Node *node;
    char buffer[patternSize + 1];
    strcpy(buffer, str);
    char *word = strtok(buffer," ");
    for(i=0;word;i++)
    {
        if(i>=patternSize)    return 0;    // the number of word in str is more than the length of pattern
        node = &hashtable[hash(word)];

        if(alphabet[pattern[i]-'a'] != node->count)
            return 0;
        alphabet[pattern[i]-'a'] = node->count = i+1;
        word = strtok(NULL," ");
    }
    hashtable_free(hashtable);
    return i==patternSize?1:0;
}
实现五:下面这个算法有时间也熟悉过一下
bool wordPattern4(char* pattern, char* str){
    bool follow = false;
    int sl = strlen(str);
    int pl = strlen(pattern);
    char c = ' ';
    char** strArray;
    int i = 0;
    int j = 0;
    int k = 0;
    int temp = 0;

    if ((pl==1)) return true;
    bool endofstr = false;
    strArray =  malloc(pl*sizeof(char*));

    for (j = 0; endofstr == false; j++){
        strArray[j] = malloc(10*sizeof(char));
        k = 0;
        while( i < sl){
            if (str[i]!=c)
                strArray[j][k] = str[i];
            else{
                strArray[j][k] = '\0';
                i++;
                break;
            }
            k++;
            i++;
        }
        if (i == sl) endofstr = true;
        printf("%d sub-string, %s\n", j, strArray[j]);
    }

    //    for (i = 0; i <= j; i++){
    //        printf("%d:%s\n",i,strArray[i]);
    //    }

    if (pl != j) return false;

    for (i = 0; i < pl-1; i++){
        for (k = i+1; k < pl; k++){

            temp = strcmp(strArray[i], strArray[k]);
            if ((pattern[i] == pattern[k]) && !temp)
                follow = true;
            else if ((pattern[i] != pattern[k]) && temp)
                follow = true;
            else
                return false;
        }
    }
    return follow;
}
Review
这篇文章来自 https://medium.com/@JimmyMAndersson/ios-development-and-the-wrong-kind-of-mvc-4e3e2decb82e, 这篇文章前面在讲怎么在iOS开发中使用 MVC设计模式的,但是后面又在讲继承,博客质量一般般
iOS Development and the Wrong Kind of MVC
When starting out as an iOS Developer, you get to hear a lot about the MVC (Model-View-Controller) Pattern and how it’s the best when developing mobile applications. The MVC Pattern is a good way to think about certain problems when it comes to developing applications with a graphical user interface. It provides you with a way of thinking that lets you split your code into manageable packages, where each package will handle its own problem domain.
当你开始做一个iOS开发者的时候,你会听到很多关于MVC(模型-视图-控制器)模式以及在开发移动应用程序时它是如何最好的。在使用图形用户界面开发应用程序时,MVC模式是考虑某些问题的好方法。它为您提供了一种思维方式,允许您将代码分割为可管理的包,其中每个包将处理自己的问题域。
What are these packages you’re talking about?
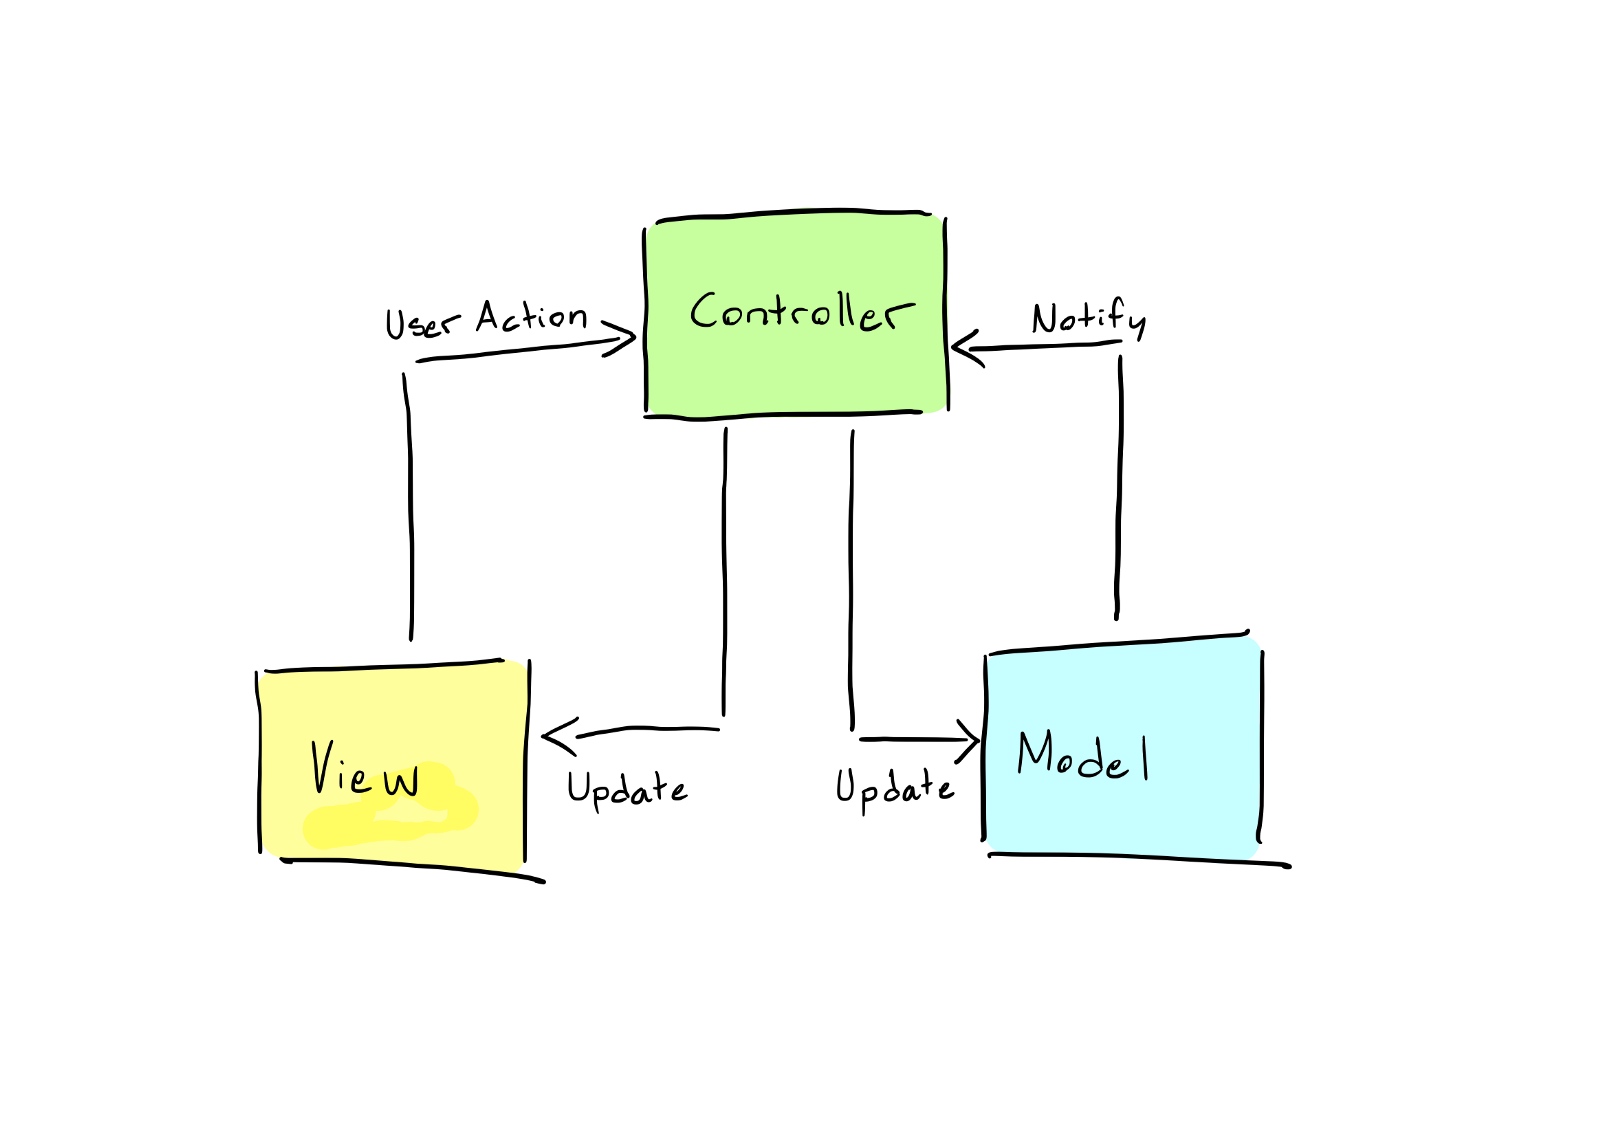
There are three different conceptual packages in MVC that are supposed to handle problems like so: MVC中有三个不同的概念包,它们应该可以处理这样的问题:
Model: The Model package handles what developers call The Business Logic. What The Business Logic is, depends on your particular application, but you can loosely generalize it to mean “the stuff in your application that manages your data and keeps it up to date and accurate”. This means that it’s the Models job to keep track of the position of your game characters, to know how many times you’ve played a song on iTunes, to save your edited photos to a format that you can share on social media… The Model is what makes your application smart.
模型包处理开发人员所称的业务逻辑。业务逻辑是什么,取决于您的特定应用程序,但是您可以松散地将其概括为“应用程序中管理数据并使其保持最新和准确的内容”。这意味着它的模型工作跟踪你的游戏角色的位置,知道多少次你在iTunes上演奏了一首歌,保存编辑照片的格式你可以分享在社交媒体上……模型使您的应用程序更智能。。
View: The View in an MVC application will represent data that is sent from the Model and display it to the user. A View is supposed to be “dumb”, meaning that it should only know how to draw or display the data that it receives but should never make any adjustments to it or even be aware of what kind of data it is.
MVC应用程序中的视图将表示从模型发送的数据,并将其显示给用户。视图应该是“哑的”,这意味着它应该只知道如何绘制或显示接收到的数据,但不应该对其进行任何调整,甚至不应该知道它是什么类型的数据。
Controller: The Controller package is what makes an app fun to use. It’s responsible for interpreting the taps, presses, clicks, and tilts of your device, and send them off to make updates to the Model or the View. The Controller should be “thin”, meaning that it should just interpret the input and pass the appropriate signal along to the right place, in order for the application to make adjustments according to what the user expects. When information flows between the Model and the View, the Controller will act as a link. 控制器包使应用程序使用起来很有趣。它负责解释设备的点击、按压、点击和倾斜,并将其发送到模型或视图进行更新。控制器应该是“瘦”的,这意味着它应该解释输入并将适当的信号传递到正确的位置,以便应用程序根据用户的期望进行调整。当信息在模型和视图之间流动时,控制器将充当链接。
So, what about iOS and “the wrong kind of MVC”? 那么,iOS和“错误的MVC”又如何呢? When developing for iOS, the Model-View-Controller Pattern will often take the form of a MassiveViewController Pattern. 在为iOS开发时,模型-视图-控制器模式通常采用MassiveViewController模式的形式。 Take a look at this example of a Controller class.
import UIKit

class MassiveViewController: UIViewController {

  private var stackView: UIStackView = {
    let stack = UIStackView()
    stack.translatesAutoresizingMaskIntoConstraints = false
    stack.axis = .vertical
    stack.alignment = .center
    stack.distribution = .fillProportionally
    return stack
  }()

  private var photoView = UIImageView(image: UIImage(named: "SomeImage"))

  private var descriptionLabel: UILabel = {
    let label = UILabel()
    label.textColor = .black
    label.text = "Descriptive text"
    return label
  }()

  override func viewDidLoad() {
    super.viewDidLoad()
    self.stackView.addArrangedSubview(self.photoView)
    self.stackView.addArrangedSubview(self.descriptionLabel)
    self.view.addSubview(self.stackView)

    self.stackView.topAnchor.constraint(equalTo: self.view.safeAreaLayoutGuide.topAnchor).isActive = true
    self.stackView.bottomAnchor.constraint(equalTo: self.view.safeAreaLayoutGuide.bottomAnchor).isActive = true
    self.stackView.leadingAnchor.constraint(equalTo: self.view.safeAreaLayoutGuide.leadingAnchor).isActive = true
    self.stackView.trailingAnchor.constraint(equalTo: self.view.safeAreaLayoutGuide.trailingAnchor).isActive = true

    let photoTapRecognizer = UITapGestureRecognizer(target: self, action: #selector(handlePhotoViewTap(_:)))
    self.photoView.addGestureRecognizer(photoTapRecognizer)

    let labelTapRecognizer = UITapGestureRecognizer(target: self, action: #selector(handleDescriptionLabelTap(_:)))
    self.descriptionLabel.addGestureRecognizer(labelTapRecognizer)
  }

  @objc private func handlePhotoViewTap(_ sender: UITapGestureRecognizer) {
    // Do something mind blowing
  }

  @objc private func handleDescriptionLabelTap(_ sender: UITapGestureRecognizer) {
    // Do some other cool thing
  }
}
MassiveViewController.swift
I’m sure this looks familiar and that you may have written something like this, I know I have. So what is the problem here? 我确信这看起来很熟悉,你可能写过这样的东西,我知道我写过。那么问题是什么呢?
The problem with this file is that it does not separate concerns. It is not adopting the MVC Pattern, and therefore the class gets massive and will be very hard to maintain if we make changes to the application in the future. 这个文件的问题是它没有分离关注点。它没有采用MVC模式,因此类变得非常庞大,如果我们将来对应用程序进行更改,将很难维护。
Looking at the code, you can see that this is supposed to be a Controller class, yet it takes on responsibilities of the View as well, setting up visual elements that are only there to display data to the user. 查看代码,您可以看到这应该是一个Controller类,但它也承担了视图的责任,设置了只用于向用户显示数据的可视化元素。
How do we improve it?
class PlainMVCView: UIView {

  private var stackView: UIStackView = {
    let stack = UIStackView()
    stack.translatesAutoresizingMaskIntoConstraints = false
    stack.axis = .vertical
    stack.alignment = .center
    stack.distribution = .fillProportionally
    return stack
  }()

  private var photoView = UIImageView(image: UIImage(named: "SomeImage"))

  private var descriptionLabel: UILabel = {
    let label = UILabel()
    label.textColor = .black
    label.text = "Descriptive text"
    return label
  }()

  override init(frame: CGRect) {
    super.init(frame: frame)
    setupView()
  }

  required init?(coder aDecoder: NSCoder) {
    super.init(coder: aDecoder)
    setupView()
  }

  private func setupView() {
    self.stackView.addArrangedSubview(self.photoView)
    self.stackView.addArrangedSubview(self.descriptionLabel)
    self.addSubview(self.stackView)

    self.stackView.topAnchor.constraint(equalTo: self.safeAreaLayoutGuide.topAnchor).isActive = true
    self.stackView.bottomAnchor.constraint(equalTo: self.safeAreaLayoutGuide.bottomAnchor).isActive = true
    self.stackView.leadingAnchor.constraint(equalTo: self.safeAreaLayoutGuide.leadingAnchor).isActive = true
    self.stackView.trailingAnchor.constraint(equalTo: self.safeAreaLayoutGuide.trailingAnchor).isActive = true
  }

  public func addPhotoViewGestureRecognizer(_ recognizer: UIGestureRecognizer) {
    self.photoView.addGestureRecognizer(recognizer)
  }

  public func addDescriptionLabelGestureRecognizer(_ recognizer: UIGestureRecognizer) {
    self.descriptionLabel.addGestureRecognizer(recognizer)
  }
}
PlainMVCView.swift
class PlainMVCViewController: UIViewController {

  override func loadView() {
    self.view = PlainMVCView()
  }

  override func viewDidLoad() {
    let photoTapRecognizer = UITapGestureRecognizer(target: self, action: #selector(handlePhotoViewTap(_:)))
    // This will work for now, because we know the specific type of the view.
    // However, force casting should be avoided in general. More on that in the next example.
    (self.view as! PlainMVCView).addPhotoViewGestureRecognizer(photoTapRecognizer)

    let labelTapRecognizer = UITapGestureRecognizer(target: self, action: #selector(handleDescriptionLabelTap(_:)))
    (self.view as! PlainMVCView).addDescriptionLabelGestureRecognizer(labelTapRecognizer)
  }

  @objc private func handlePhotoViewTap(_ sender: UITapGestureRecognizer) {
    // Do something mind blowing
  }

  @objc private func handleDescriptionLabelTap(_ sender: UITapGestureRecognizer) {
    // Do something a little less mind blowing, but still cool
  }
}
PlainMVCViewController.swift
Above is the same code, but split up into chunks that correspond to a single MVC responsibility. Note that the Controller class shrunk a fair bit. However, the View class is almost the same size as the original file was. So what did we really win? This is the tricky part about MVC, because if you need to write more code, it may not always seem like you’re getting something out of it. 上面是相同的代码,但是被分割成块,这些块对应于单个MVC职责。注意,控制器类缩小了一点。但是,视图类的大小几乎与原始文件的大小相同。那么我们到底赢了什么?这是MVC中比较棘手的部分,因为如果您需要编写更多的代码,它可能并不总是看起来像是从中得到了什么。
By refactoring the code like this, it will adhere to the Separation of Concerns Principle. The Controller class only deals with Controller problems and is, apart from initializing the corresponding View object, completely separated from everything that is related to displaying stuff to the user. This will be a valuable feature as the application grows, because one day you may want to replace a Controller class with a new, better one. If the Controller is separated from the View, that means less work for you and the likelihood of bugs and errors decrease. Also note that we defined two methods in our View to aid Controllers who may want to listen to tap events on either of the “interesting” parts of the view, as not to violate Law of Demeter. 通过这样重构代码,它将坚持关注点分离原则。控制器类只处理控制器问题,除了初始化相应的视图对象外,它与向用户显示内容相关的所有内容完全分离。随着应用程序的发展,这将是一个有价值的特性,因为有一天您可能想要用一个新的、更好的控制器类来替换控制器类。如果控制器与视图分离,那么您的工作量就会减少,bug和错误的可能性就会降低。还要注意,我们在视图中定义了两个方法,以帮助那些可能想要监听视图中“有趣”部分的事件的控制器,以避免违反Demeter定律。
Is that it?
Well, if we move away from the pure MVC aspect of it, you can see that our Controller class is depending very heavily on a single implementation of a View class. This goes against the principles of extensibility and coupling, so let’s try to fix that with some generics and abstractions.
好吧,如果我们离开它纯粹的MVC方面,你可以看到我们的控制器类非常依赖于一个视图类的单一实现。这违背了可扩展性和耦合的原则,所以让我们尝试用一些泛型和抽象来修复它。
      protocol Controller {
  associatedtype ViewType
  var currentView: ViewType { get }
}

class BaseViewController<ViewType: UIView>: UIViewController, Controller {

  override func loadView() {
    self.view = ViewType()
  }

  var currentView: ViewType {
    /*
     Because of how we implemented loadView(), this cast should never fail.
     However, linters and such tools may complain if we force cast and we want
     to be good developers, so we perform Optional binding just to be safe.
     */
    if let view = self.view as? ViewType {
      return view
    } else {
      let view = ViewType()
      self.view = view
      return view
    }
  }
}
BaseController.swift
  protocol View {
  func setupView()
}

class BaseView: UIView, View {

  override init(frame: CGRect) {
    super.init(frame: frame)
    setupView()
  }

  required init?(coder aDecoder: NSCoder) {
    super.init(coder: aDecoder)
    setupView()
  }

  func setupView() {
    // Use this method to do any set up that is shared between all your views,
    // for example drawing backgrounds, etc.
  }
}

  BaseView.swift
  @objc protocol MVCViewActionDelegate: AnyObject {
  func photoViewWasTapped()
  func descriptionLabelWasTapped()
}

class MVCView: BaseView {

  private var stackView: UIStackView = {
    let stack = UIStackView()
    stack.translatesAutoresizingMaskIntoConstraints = false
    stack.axis = .vertical
    stack.alignment = .center
    stack.distribution = .fillProportionally
    return stack
  }()

  private var photoView = UIImageView(image: UIImage(named: "SomeImage"))

  private var descriptionLabel: UILabel = {
    let label = UILabel()
    label.textColor = .black
    label.text = "Descriptive text"
    return label
  }()

  public weak var actionDelegate: MVCViewActionDelegate?

  override func setupView() {
    super.setupView()

    self.stackView.addArrangedSubview(self.photoView)
    self.stackView.addArrangedSubview(self.descriptionLabel)
    self.addSubview(self.stackView)

    self.stackView.topAnchor.constraint(equalTo: self.safeAreaLayoutGuide.topAnchor).isActive = true
    self.stackView.bottomAnchor.constraint(equalTo: self.safeAreaLayoutGuide.bottomAnchor).isActive = true
    self.stackView.leadingAnchor.constraint(equalTo: self.safeAreaLayoutGuide.leadingAnchor).isActive = true
    self.stackView.trailingAnchor.constraint(equalTo: self.safeAreaLayoutGuide.trailingAnchor).isActive = true

    let photoTapEvent = UITapGestureRecognizer(target: self.actionDelegate, action: #selector(MVCViewActionDelegate.photoViewWasTapped))
    self.photoView.addGestureRecognizer(photoTapEvent)

    let labelTapEvent = UITapGestureRecognizer(target: self.actionDelegate, action: #selector(MVCViewActionDelegate.descriptionLabelWasTapped))
    self.descriptionLabel.addGestureRecognizer(labelTapEvent)
  }
}

MVCView.swift
  class MVCViewController: BaseViewController<MVCView>, MVCViewActionDelegate {

  override func viewDidLoad() {
    super.viewDidLoad()
    self.currentView.actionDelegate = self
  }

  func photoViewWasTapped() {
    // Do some mind blowing stuff
  }

  func descriptionLabelWasTapped() {
    // Do some other cool junk
  }
}
  MVCViewController.swift
Now we’ve got 4 files all of a sudden (7 files, if you separate the protocols into their own files). Is this really necessary?? 现在我们突然有了4个文件(7个文件,如果你把协议分离到它们自己的文件中)。这真的有必要吗??
What happened here is that we abstracted away any possible common behavior of both Controller and View classes, and put them into a Base class. The base class is not really meant to be initialized on its own, but defines and provides common operations and flows that every subclass will share. 这里发生的事情是,我们抽象出了控制器和视图类的任何可能的公共行为,并将它们放入基类中。基类实际上并不打算自己初始化,而是定义并提供了每个子类都将共享的通用操作和流。
This means that all future Controller and View subclasses will be smaller, easier to read, and easier to maintain as you won’t have to duplicate all the shared behavior. You will thank the stars if you decide to, for example, change the background image of all views. Instead of changing the same line in 20 classes, you will only have to change it in the one Base class. Easy! 这意味着所有未来的控制器和视图子类都将更小,更易于阅读,更易于维护,因为您不必复制所有共享行为。例如,如果你决定改变所有视图的背景图像,你会感谢星星。不需要在20个类中更改同一行,只需要在一个基类中更改即可。简单!
This also means that if you want to change what kind of View class is associated with a certain Controller, it will be much less work. Since we adopted the MVCViewActionDelegate protocol, switching out the View class will be as easy as changing the class name in the generic constraint, and implement the new action delegate methods (if there are any accompanying the new View). 这也意味着,如果您想更改与某个控制器相关联的视图类的类型,那么工作量就会大大减少。因为我们采用了MVCViewActionDelegate协议,所以切换视图类就像在通用约束中更改类名一样简单,并实现新的动作委托方法(如果新视图附带任何操作)。
Hopefully, the way to think about MVC when developing your iOS applications has become a little less daunting and a little more clear after reading this. Feel free to comment if you have questions, and follow to get notifications about future articles. 希望在阅读这篇文章之后,在开发iOS应用程序时考虑MVC的方法变得不那么令人畏惧,而且更加清晰。如果您有任何问题,请随时发表评论,并关注后续文章。
Tips
imgView.contentMode = UIViewContentModeScaleAspectFill; 如果设置这个属性的话,要设置imgView.clipsToBounds = YES; 否则,图片不合适的话,会超出视图。
最近做了个需求,给UIImageView的设置图片,UIImageView的大小是375X88或375X64,图片的大小是1000X400,要求图片宽度不能截取,高度只能截取图片的顶部,我是用自己截图完成的,实现方法如下的:
    CGFloat height =  UIImageView.height / (UIImageView.width) * image.size.width;
    CGImageRef imageRef = image.CGImage;
    CGImageRef imageRefRect = CGImageCreateWithImageInRect(imageRef, CGRectMake(0, image.size.height - height, image.size.width, height));
    UIImage *newImage = [[UIImage alloc] initWithCGImage:imageRefRect];
    CGImageRelease(imageRefRect);
    UIImageView.image = newImage;
那么用UIImageView的contentMode 能不能完成这个需求呢?虽然这个模式之前也用过,但是没有总结过,趁着这个机会总结一下: 测试demo:https://github.com/dandan2009/UIImageViewContentMode
- (void)viewDidLoad {
[super viewDidLoad];
// Do any additional setup after loading the view, typically from a nib.
//最近做了个需求,给UIImageView的设置图片,UIImageView的大小是375X88或375X64,图片的大小是1000X400,要求图片宽度不能截取,高度只能截取图片的顶部,我是用自己截图完成的,实现方法如下的:
// 伪代码 image就是图片
// CGFloat height = UIImageView.height / (UIImageView.width) * image.size.width;
// CGImageRef imageRef = image.CGImage;
// CGImageRef imageRefRect = CGImageCreateWithImageInRect(imageRef, CGRectMake(0, image.size.height - height, image.size.width, height));
// UIImage *newImage = [[UIImage alloc] initWithCGImage:imageRefRect];
// CGImageRelease(imageRefRect);
// UIImageView.image = newImage;
// 那么用UIImageView的contentMode 能不能完成这个需求呢?虽然这个模式之前也用过,但是没有总结过,趁着这个机会总结一下
UIScrollView *scrollView = [[UIScrollView alloc] init];
scrollView.frame = self.view.bounds;
scrollView.backgroundColor = [UIColor greenColor];
scrollView.contentSize = CGSizeMake(self.view.frame.size.width, 1200);
[self.view addSubview:scrollView];
UIImage *iconImage = [UIImage imageNamed:@"icon"];
CGFloat imageWidth = iconImage.size.width;
CGFloat imageheight = iconImage.size.height;
UILabel *lab = [[UILabel alloc] initWithFrame:CGRectMake(10, 30, 370, 20)];
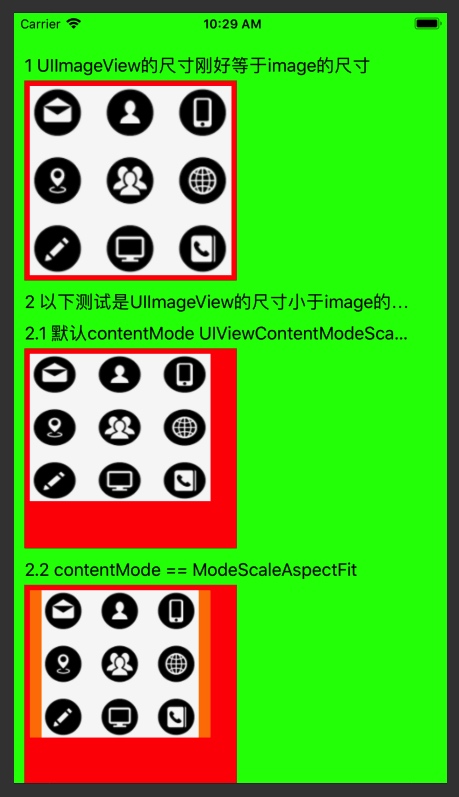
lab.text = @"1 UIImageView的尺寸刚好等于image的尺寸";
[scrollView addSubview:lab];
UIView *base1 = [[UIView alloc] initWithFrame:CGRectMake(lab.left, lab.bottom + 5, imageWidth + 10, imageheight + 10)];
base1.backgroundColor = [UIColor redColor];
[scrollView addSubview:base1];
UIImageView *imageView1 = [[UIImageView alloc] initWithFrame:CGRectMake(5, 5, imageWidth , imageheight )];
imageView1.image = iconImage;
imageView1.backgroundColor = [UIColor orangeColor];
[base1 addSubview:imageView1];
UILabel *labsec1 = [[UILabel alloc] initWithFrame:CGRectMake(base1.left, base1.bottom + 10, 370, 20)];
labsec1.text = @"2 以下测试是UIImageView的尺寸小于image的尺寸";
[scrollView addSubview:labsec1];
/// 默认contentMode UIViewContentModeScaleToFill
// 可以看到这个是把图片的拉伸或压缩,使图片的大小刚好等于imageview的大小
UILabel *lab2 = [[UILabel alloc] initWithFrame:CGRectMake(labsec1.left, labsec1.bottom + 10, 370, 20)];
lab2.text = @"2.1 默认contentMode UIViewContentModeScaleToFill";
[scrollView addSubview:lab2];
UIView *base2 = [[UIView alloc] initWithFrame:CGRectMake(lab2.left, lab2.bottom + 5, imageWidth + 10, imageheight + 10)];
base2.backgroundColor = [UIColor redColor];
[scrollView addSubview:base2];
UIImageView *imageView2 = [[UIImageView alloc] initWithFrame:CGRectMake(5, 5, imageWidth-20 , imageheight-40 )];
imageView2.backgroundColor = [UIColor orangeColor];
imageView2.image = iconImage;
[base2 addSubview:imageView2];
///ModeScaleAspectFit 图片在不超出UIImageView的情况下,保证图片不变形,就有可能导致UIImageView不被image冲满,有空白留出
UILabel *lab3 = [[UILabel alloc] initWithFrame:CGRectMake(base2.left, base2.bottom + 10, 370, 20)];
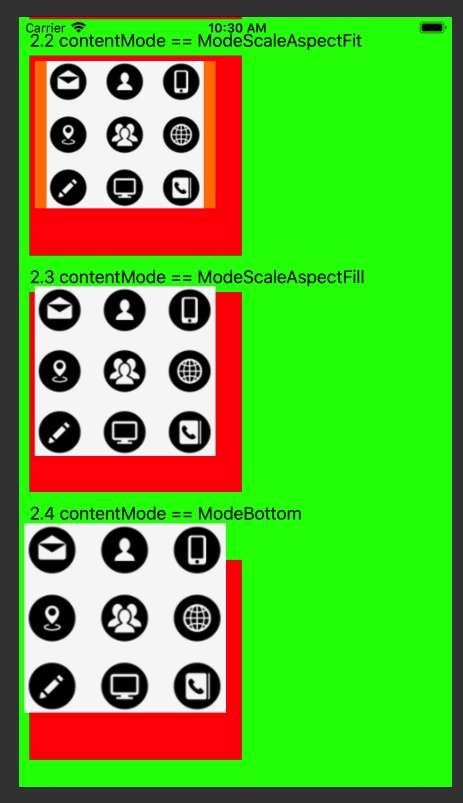
lab3.text = @"2.2 contentMode == ModeScaleAspectFit";
[scrollView addSubview:lab3];
UIView *base3 = [[UIView alloc] initWithFrame:CGRectMake(lab3.left, lab3.bottom + 5, imageWidth + 10, imageheight + 10)];
base3.backgroundColor = [UIColor redColor];
[scrollView addSubview:base3];
UIImageView *imageView3 = [[UIImageView alloc] initWithFrame:CGRectMake(5, 5, imageWidth-20 , imageheight-40 )];
imageView3.contentMode = UIViewContentModeScaleAspectFit;
imageView3.image = iconImage;
imageView3.backgroundColor = [UIColor orangeColor];
[base3 addSubview:imageView3];
/// ModeScaleAspectFill 图片在保证UIImageView被填满的情况下 ,保证图片不变形,就有可能导致image超出UIImageView
UILabel *lab4 = [[UILabel alloc] initWithFrame:CGRectMake(base3.left, base3.bottom + 10, 370, 20)];
lab4.text = @"2.3 contentMode == ModeScaleAspectFill";
[scrollView addSubview:lab4];
UIView *base4 = [[UIView alloc] initWithFrame:CGRectMake(lab4.left, lab4.bottom + 5, imageWidth + 10, imageheight + 10)];
base4.backgroundColor = [UIColor redColor];
[scrollView addSubview:base4];
UIImageView *imageView4 = [[UIImageView alloc] initWithFrame:CGRectMake(5, 5, imageWidth-20 , imageheight-40 )];
imageView4.backgroundColor = [UIColor orangeColor];
imageView4.contentMode = UIViewContentModeScaleAspectFill;
imageView4.image = iconImage;
[base4 addSubview:imageView4];
//ModeBottom 图片在保证UIImageView被填满, 且UIImageView底部不被超出的情况下,image按自己的实际大小完全展示,有可能导致image超出UIImageView
UILabel *lab5 = [[UILabel alloc] initWithFrame:CGRectMake(base4.left, base4.bottom + 10, 370, 20)];
lab5.text = @"2.4 contentMode == ModeBottom";
[scrollView addSubview:lab5];
UIView *base5 = [[UIView alloc] initWithFrame:CGRectMake(lab5.left, lab5.bottom + 35, imageWidth + 10, imageheight + 10)];
base5.backgroundColor = [UIColor redColor];
[scrollView addSubview:base5];
UIImageView *imageView5 = [[UIImageView alloc] initWithFrame:CGRectMake(5, 5, imageWidth-20 , imageheight-40 )];
imageView5.backgroundColor = [UIColor orangeColor];
imageView5.contentMode = UIViewContentModeBottom;
imageView5.image = iconImage;
[base5 addSubview:imageView5];
}
Share
总结一下做算法题的感受:
上周一道算法题做了差不多一天,也没做出来,就在哪死抠,效率实在太低,所以以后一道题最多半小时,做不出来就看别人的实现,然后自己再实现一遍,本周就是按照这个套路来的。
本周这道题自己为什么没有做出来呢? 1 对C语言基础知识不熟,对相应的库不熟,比如 strcpy、strtok、strcmp 2 但是还是练的太少,做的太少,还是要多看书啊。
本来以为已经理解了别人的算法了,结果自己实现起来还是出错了,所以一定要实践!
现在LeetCode的题目已经越来越多了,几乎不可能存在刷完的可能了,怎么办,我觉得可以这样: 把题目分类,每类题目先做几个,然后总结出解决这类题目思考方向,每周根据自己的情况可以做上几道题,反正不能用蛮力,不能死扣,要回归训练思维方式的初衷,一道题半小时10分钟想不出来怎么做,就看看别人的思路,自己再实现,然后再看看别人优秀的答案,在做题的同时要把一些基本的算法(比如排序、搜索、二叉树、图等)赶快补齐,要看算法书。