ARTS是
由左耳朵耗子--陈皓发起的一个活动: 每周至少做一个leetcode的算法题、阅读并点评至少一篇英文技术文章、学习至少一个技术技巧、分享一篇有观点和思考的文章。(也就是Algorithm、Review、Tip、Share简称ARTS),至少坚持一年。
ARTS 010
这是第10篇
Algorihm 算法题
本周做了两道算法题
题目1
leetcode算法第767题.Reorganize String: 难度:中等
Given a string S, check if the letters can be rearranged so that two characters that are adjacent to each other are not the same.

If possible, output any possible result.  If not possible, return the empty string.

Example 1:

Input: S = "aab"
Output: "aba"
Example 2:

Input: S = "aaab"
Output: ""
Note:

S will consist of lowercase letters and have length in range [1, 500].
我的解题思路,首先我想到的是如果某一个字母的个数超过S长度的一半,那么肯定是返回“”的,题目要求只包含小写字母,我就想到先计算字符串S中每个字符的个数,然后就想到了按字符个数多少排序,最后要考虑一些边界条件,时间复杂度和空间复杂度。具体实现如下,LeetCode的运行时间是0ms,时间复杂度是O(n)。
char* reorganizeString(char* S) {
    int len = strlen(S);

    //计算S中每个字母的个数
    //Calculate the number of  letters in S
    int* charCount = (int*)malloc(sizeof(int) * 26);
    memset(charCount, 0, sizeof(int) * 26);
    for (int i = 0; i < len; i++) {
        int index = S[i] - 97;
        charCount[index]++;
    }

    //如果某一个字母的个数超过S长度的一半,直接返回""
    //If the number of letters is more than half the length of S, directly return  ""
    for (int i = 0; i < 26; i++) {
        int index  = charCount[i];
        if (index > len/2 + len%2) {
            return "";
        }
    }


    //"排序",这里的排序是按字母的个数排序,字母多的放到前面。比如S="dddbbbbffkkkkkk",那么排序后的orderS是"kkkkkkbbbbdddff"
    //"sorting",The sorting here is sorted by the number of letters, and put the more letters in front,eg:if S="dddbbbbffkkkkkk",so orderS is "kkkkkkbbbbdddff"
    char * orderS = (char*)malloc(sizeof(char*) * len);
    int count = 0;
    for (int i = 0; i < 26; i++) {
        int  sortingNum = charCount[i];
        int maxIndex = i;
        for (int j =0; j < 26; j++) {
            if (sortingNum < charCount[j] ) {
                sortingNum = charCount[j];
                maxIndex = j;
            }
        }
        for (int j = 0; j < sortingNum; j++) {
            orderS[count++] = maxIndex + 97;
        }
        charCount[maxIndex] = 0;
    }

    //打乱顺序 比如orderS是'bbbc ccdd',打乱后就是bcbcbdcd
    //reorganizeString eg: orderS is 'bbbc ccdd', reorganizeString is bcbcbdcd
    int max = len/2;
    int mid = max+ len%2;
    for (int i =0; i < max; i++) {
        S[2*i] =orderS[i];
        S[2*i+1] =orderS[mid+i];
    }
    if (len%2) {
        S[len -1] = orderS[max];
    }
    free(orderS);
    free(charCount);

    return S;
}
题目2
leetcode算法第541题.Reverse String II: 难度:简单
Given a string and an integer k, you need to reverse the first k characters for every 2k characters counting from the start of the string. If there are less than k characters left, reverse all of them. If there are less than 2k but greater than or equal to k characters, then reverse the first k characters and left the other as original.
Example:
Input: s = "abcdefg", k = 2
Output: "bacdfeg"
Restrictions:
The string consists of lower English letters only.
Length of the given string and k will in the range [1, 10000]
这个题目比较简单,就是多考虑几种情况就行了
void ReverseString(char* str,int min,int max) {
    int i = min;
    int j = max;
    while (i < j) {
        char temp = * (str + i);
        * (str + i) = * (str + j);
        * (str + j)  = temp;

        i++;
        j--;
    }
}

char* reverseStr(char* s, int k) {
    u_long strlength =  strlen(s);
    if ( k == 0) {
        ReverseString(s,0,strlength-1);

    }
    else {
        u_long count = strlength/(2*k);
        for (int i = 0; i < count; i++) {
            ReverseString(s,(2*k)*i,(2*k)*i + k-1);
        }
        u_long count_1 = strlength%(2*k);
        if (count_1 > 0) {
            if(count_1<k){//剩余少于 k 个字符
                ReverseString(s,strlength- count_1,strlength -1);
            }
            else{//小于 2k 但大于或等于 k 个字符
                ReverseString(s,strlength- count_1,strlength- count_1  + k -1);
            }
        }
    }
    return s;
}
Review
这篇文章来自:https://medium.freecodecamp.org/how-to-become-a-git-expert-e7c38bf54826
How to become a Git expert 如何成为Git专家
 “time-lapse photography of man standing beside road and bridge during daytime” by Ahsan Avi on Unsplash
白天人们站在路边和桥边的延时摄影 by Ahsan Avi on Unsplash
“time-lapse photography of man standing beside road and bridge during daytime” by Ahsan Avi on Unsplash
白天人们站在路边和桥边的延时摄影 by Ahsan Avi on Unsplash
I made a mistake in my commit, how do I fix it ? 在提交代码的时候我算了一个错误,该怎么改正?
My commit history is a mess, how do I make it neater? 我的代码提交记录很混乱,我该怎样让他保持整洁。
If you have ever had the above questions, then this post is for you. This post covers a list of topics which will make you a Git expert. 如果你曾经有过上述问题,那么这篇文章就是为你准备的。这篇文章涵盖了一系列可以让你成为Git专家的话题。
If you do not know Git basics, click here to check out my blog on Git basics. It is necessary that you know basics of Git to make the best use of this article. 如果您不了解Git基础知识,请点击这里查看我的Git基础博客。了解Git的基础知识是充分利用本文的必要条件。
 “broken ceramic plate on floor” by chuttersnap on Unsplash
地板上的陶瓷板碎了 by chuttersnap on Unsplash
“broken ceramic plate on floor” by chuttersnap on Unsplash
地板上的陶瓷板碎了 by chuttersnap on Unsplash
Scenario 1 情景1
Let’s say(假设) that you have committed a bunch of files and realised that the commit message you entered is actually not clear. Now you want to change the commit message. In order to do this you can use git commit --amend
假设您提交了一堆文件,并且意识到您输入的提交消息实际上并不清楚。现在需要更改提交消息。为了做到这一点,您可以使用git commit -amend
git commit --amend -m “New commit message”
Scenario 2 场景2
Let’s say that you wanted to commit six files but, by mistake, you end up committing only five files. You may think that you can create a new commit and add the 6th file to that commit.
假设您想提交6个文件,但错误地,您最终只提交了5个文件。您可能认为您可以创建一个新的提交,并向该提交添加第6个文件。
There is nothing wrong with this approach. But, to maintain a neat commit history, wouldn’t it be nicer if you could actually somehow add this file to your previous commit itself? This can be done through git commit --amend as well:
这种方法没有任何问题。但是,为了保持一个整洁的提交历史记录,如果您能以某种方式将这个文件添加到以前的提交本身,岂不是更好?这可以通过’ git commit -amend ‘来实现:
git add file6
git commit --amend --no-edit
--no-edit means that the commit message does not change.
Scenario 3 场景3
Whenever you do a commit in Git, the commit has an author name and author email tied to it. Generally, when you set up Git for the first time, you set up the author name and email. You don’t need to worry about the author details for every commit.
无论何时在Git中执行提交,提交都有一个作者名和作者电子邮件。通常,当您第一次设置Git时,您会设置作者名和电子邮件。您不需要为每次提交担心作者的详细信息。
That said, it’s possible that for a particular project you want to use a different email ID. You need to configure the email id for that project with the command: 也就是说,对于特定的项目,您可能希望使用不同的电子邮件ID。您需要使用以下命令配置该项目的电子邮件ID:
git config user.email “your email id”
Let’s say that you forgot to configure the email and already did your first commit. Amend can be used to change the author of your previous commit as well. The author of the commit can be changed using the following command:
假设您忘记配置电子邮件,并且已经进行了第一次提交。“Amend”也可以用来更改您以前提交的作者。提交的作者可以使用以下命令进行更改:
git commit --amend --author "Author Name <Author Email>"
Point to note 注意点
Use the amend command only in your local repository. Using amend for the remote repository can create a lot of confusion.
仅在本地存储库中使用“amend”命令。对远程存储库使用’ amend ‘会造成很多混乱。
My Commit history is a mess. How do I handle it? 我的提交历史一团糟。我怎么处理?
Let’s say that you are working on a piece of code. You know that the code is going to take approximately ten days to complete. Within those ten days, the other developers will also be committing code to the remote repository. 假设您正在处理一段代码。您知道,代码大约需要10天才能完成。在这十天内,其他开发人员也将向远程存储库提交代码。
It is a good practise to keep your local repository code up-to-date with the code in the remote repository. This avoids a lot of merge conflicts later when you raise a pull request. So you decide that you will pull the changes from the remote repository once every two days.
保持本地存储库代码与远程存储库中的代码保持最新是一个很好的实践。这避免了在以后提出pull请求时出现很多合并冲突。因此,您决定每两天从远程存储库中提取一次更改。
Every time you pull the code from the remote repository to the local repository a new merge commit is created in your local repository. This means that your local commit history is going to have a lot of merge commits which can make things look confusing to the reviewer. 每次将代码从远程存储库提取到本地存储库时,都会在本地存储库中创建新的合并提交。这意味着您的本地提交历史记录将会有很多合并提交,这会让审查人员感到困惑。
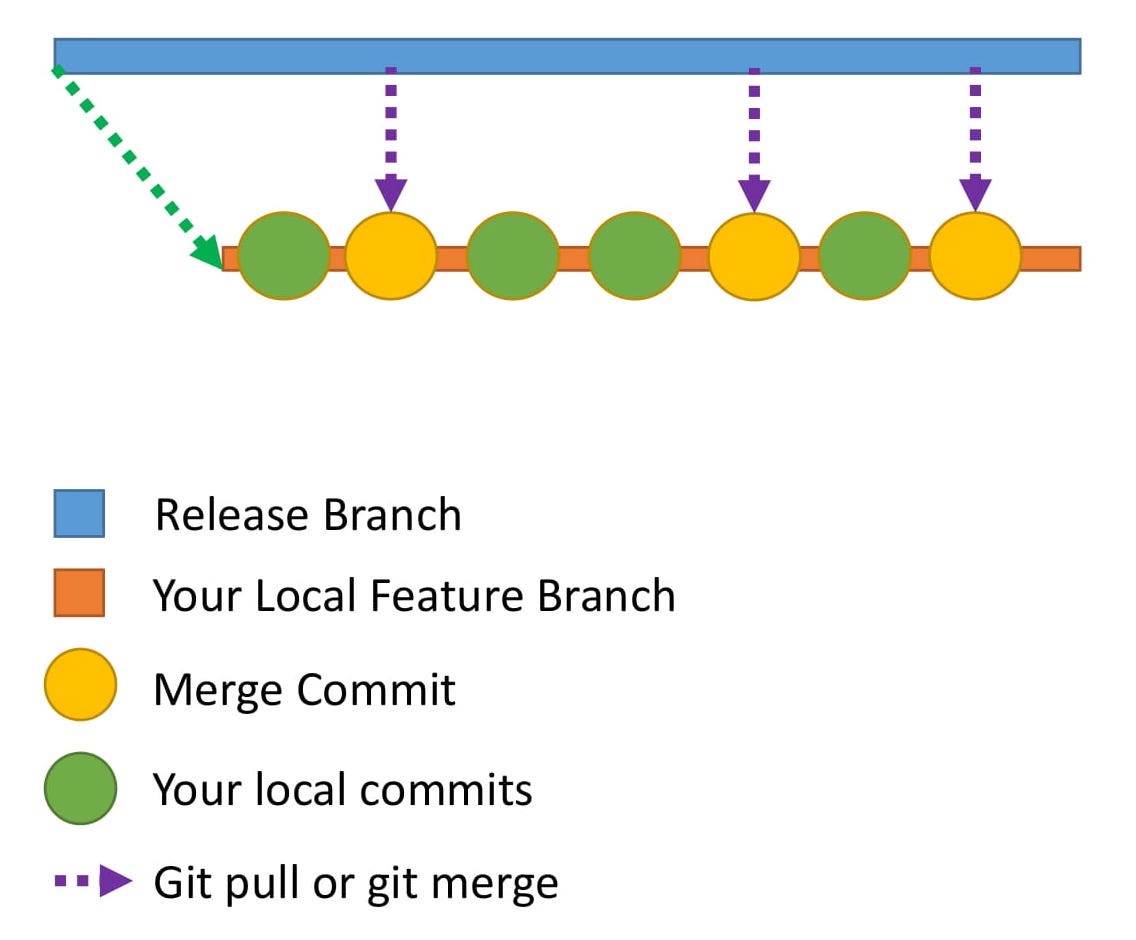 Here is how the commit history would look in your local repository.
下面是提交历史记录在本地存储库中的样子。
Here is how the commit history would look in your local repository.
下面是提交历史记录在本地存储库中的样子。
How do you make the commit history look neater? This is where rebase comes to the rescue. 如何使提交历史看起来更整洁? 这就是rebase救援的地方。
What is rebasing? Let me explain this through an example.
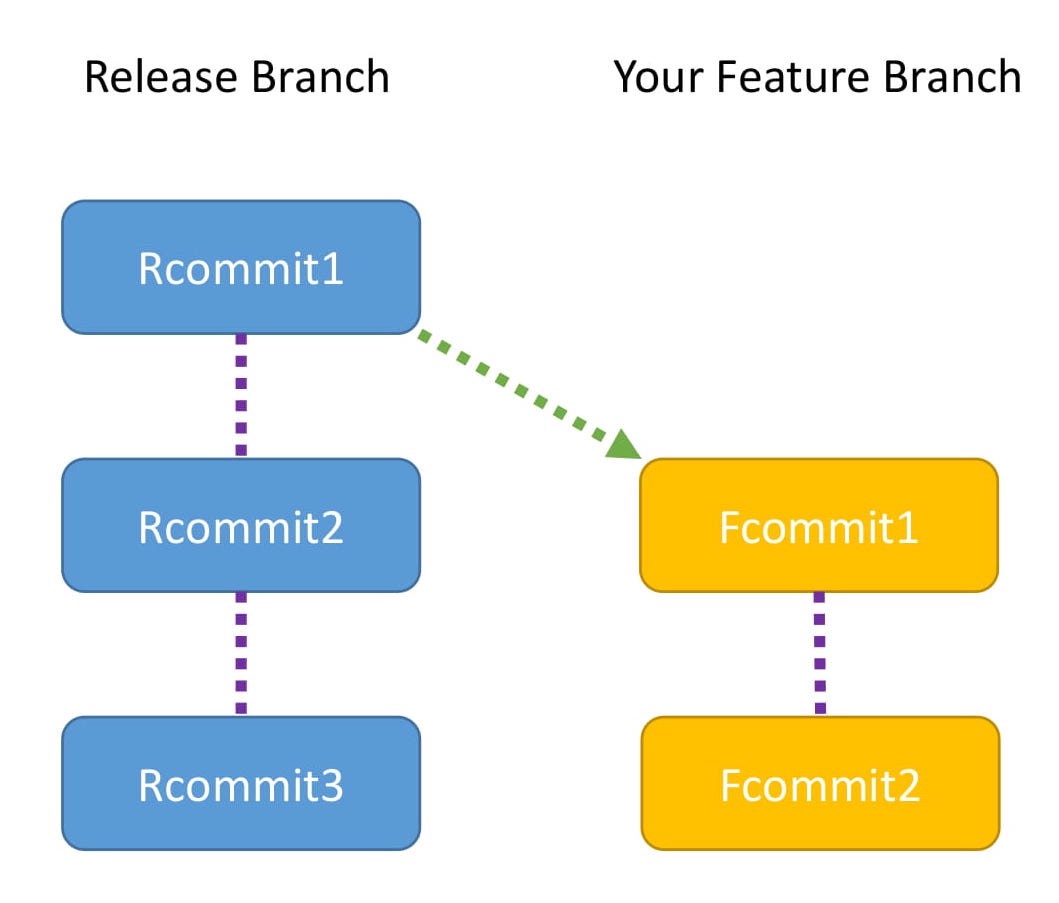 This diagram shows the commits in the release branch and your feature branch
- The Release branch has three commits: Rcommit1, Rcommit2, and Rcommit3.
- You created your Feature branch from the Release branch when it had only one commit, which is Rcommit1.
- You have added two commits to the Feature branch. They are Fcommit1 and Fcommit2.
- Your goal is to get the commits from the Release branch into your Feature branch.
- You are going to use rebase to do this.
- Let the name of the Release branch be release and the name of the Feature branch be feature.
- Rebasing can be done using the following commands:
这个图显示了发布分支和特性分支中的提交
- Release分支有三个提交:Rcommit1、Rcommit2和Rcommit3。
- 当Release分支只有一个提交(即Rcommit1)时,您从发布分支创建了Feature 分支。
- 您已经向Feature分支添加了两个提交。他们是Fcommit1和Fcommit2。
- 您的目标是将Release分支的提交合并到您的Feature分支。
- 你要用rebase来做这个。
- 让Release分支的名称为release,Feature分支的名称为feature。
- 可以使用以下命令进行重新Rebasing:
git checkout feature
git rebase release
Rebasing
While rebasing, your goal is to ensure the Feature branch gets the latest code from the Release branch.
Rebasing tries to add each commit, one by one, and checks for conflicts. Does that sound confusing?
Let me explain with the help of a diagram.
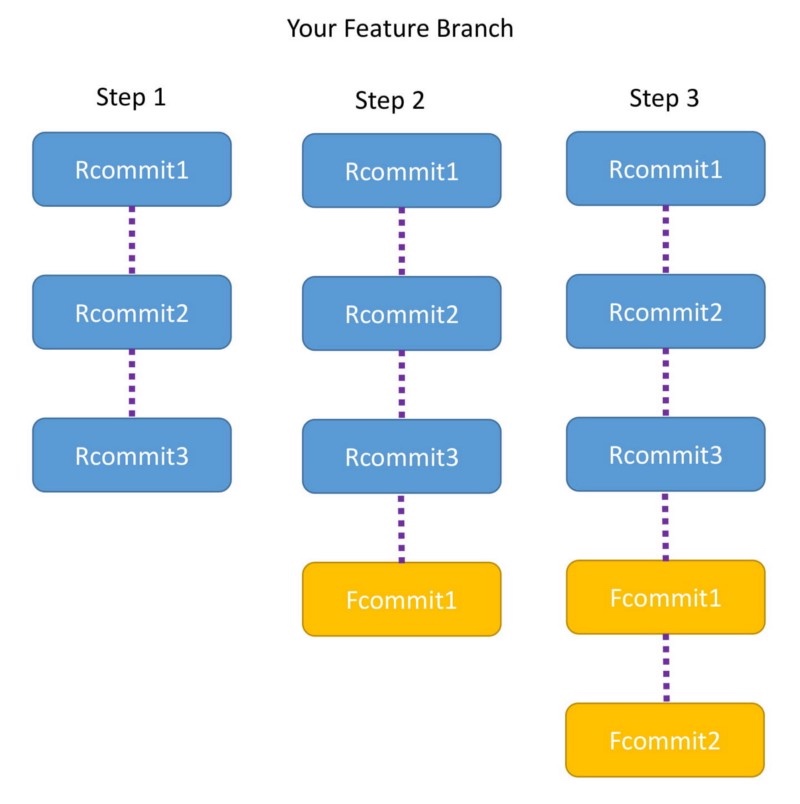
This shows what rebasing actually does internally:
变基 在重新定位时,您的目标是确保Feature分支从Release分支获得最新的代码。
rebase尝试逐个添加每个提交,并检查冲突。听起来很混乱吗?
让我用图表来解释一下。
这显示了rebase在内部的实际作用:
Step 1
- The moment you run the command, the Feature branch is pointed to the head of Release branch.
- Now the Feature branch has three commits: Rcommit1, Rcommit2, and Rcommit3.
- You may be wondering what happened to Fcommit1 and Fcommit2.
- The commits are still there and will be used in the steps below. Step 2
- Now Git tries to add Fcommit1 to the Feature branch.
- If there is no conflict Fcommit1 is added after Rcommit3
- If there is a conflict, Git will notify you, and you will have to resolve the conflict manually. Step 3
- Once Fcommit1 is added, Git will try to add Fcommit2.
- Again, if there is no conflict Fcommit2 is added after Fcommit1 and the rebase is successful.
- If there is a conflict, Git will notify you, and you will have to resolve it manually.
- After the entire rebase is done, you will notice that the Feature branch has Rcommit1, Rcommit2, Rcommit3 , Fcommit1, and Fcommit2.
步骤1
- 在运行命令时,功能分支指向发布分支的头。
- 现在特性分支有三个提交:Rcommit1、Rcommit2和Rcommit3。
- 您可能想知道Fcommit1和Fcommit2发生了什么。
- 提交仍然存在并将在下面的步骤中使用。 步骤2
- 现在Git试图将Fcommit1添加到特性分支。
- 如果没有冲突,则在Rcommit3之后添加Fcommit1
- 如果有冲突,Git会通知您,您必须手动解决冲突。 步骤3
- 添加Fcommit1之后,Git将尝试添加Fcommit2。
- 同样,如果Fcommit1之后没有冲突,则在Fcommit1之后添加Fcommit2,并且重新基数成功。
- 如果出现冲突,Git会通知您,您必须手动解决它。
- 所示。在完成整个rebase之后,您将注意到Feature分支有Rcommit1、Rcommit2、Rcommit3、Fcommit1和Fcommit2。
Points to note
- Both Rebase and Merge are useful in Git. One is not better than the other.
- In the case of a merge you will have a merge commit. In the case of a rebase there is no extra commit like a merge commit.
- One best practise is to use the commands at different points. Use rebase when you are updating your local code repository with the latest code from the remote repository. Use merge when you are dealing with pull requests to merge the Feature branch back with the Release or Master branch.
注意点
- 在Git中,Rebase和Merge都很有用。一个不比另一个好。
- 在合并的情况下,你会有一个合并提交。在rebase的情况下,没有像合并提交那样的额外提交。
- 最好的做法是在不同的地方使用不同的命令。使用远程存储库中的最新代码更新本地代码存储库时,请使用rebase。在处理pull请求时,使用merge将特性分支合并回发布分支或主分支。
Congrats
You are now a Git expert 😃
In this post you have learnt about:
- amending commits
- rebase Both of these are very useful concepts. Go explore the world of Git to learn even more.
恭喜
你现在一个Git专家
在这篇文章中,你了解到:
*修改提交 *变基 这两个概念都很有用。去探索Git的世界,了解更多。
About the author I love technology and follow the advancements in the field. I also like helping others with my technology knowledge.
Feel free to connect with me on my LinkedIn account https://www.linkedin.com/in/aditya1811/
You can also follow me on twitter https://twitter.com/adityasridhar18
Other Posts by Me An introduction to Git
TIPS:
怎么使用itms-services安装企业证书打包的ipa分发服务器
搭建服务器的过程比较简单,可以自行百度或Google, 我用的是Mac 下的nginx
我用的服务器是Mac Nginx,配置很简单,网上很多教程。现在的关键是怎么启用https.
在IOS7.1系统以后,如果要使用企业证书(299美元)通过itms-services在线安装ipa的话必须走https协议。
nginx 开启https配置: https://www.jianshu.com/p/fe0fadb38600、
在刚才的文章中有一个重启的步骤: brew services restart nginx
建议在nginx的配置文件中开启errorlog,这样启动的过程中有报错的话可以直接查看,有些报错在终端是看不到的, 比如我在用brew services restart nginx重启的过程中提示成功
Stopping `nginx`... (might take a while)
==> Successfully stopped `nginx` (label: homebrew.mxcl.nginx)
==> Successfully started `nginx` (label: homebrew.mxcl.nginx)
但是 其实是失败的,
后来在errlog中看到:bind() to 0.0.0.0:443 failed (13: Permission denied)
需要使用: sudo brew services restart nginx 启动即可
这里有个概念需要CA,关于CA的解释:https://www.cnblogs.com/handsomeBoys/p/6556336.html、https://www.jianshu.com/p/57066821b863 简单说一下,就是开启https需要证书,这个证书需要向第三方权威网站进行申请,也可以自建。当然线上运行的https网站是肯定要像第三方权威网站进行的。 因为自建的证书需要用户手动安装,而且浏览器是不信任的。如果任何人都可以创建证书https就没有意义了了。 但是我们现在的目的是公司局域网使用,所以使用自建的证书,自建的证书需要使用的用户手动安装才行。
关于itms-services的设置下面这篇文章讲的也很清楚: http://www.cnblogs.com/feiyiban588/p/5788310.html https://blog.csdn.net/RazerTang/article/details/46898051/
也可以按照以下步骤制作CA:
自己做CA
一. 简介
之前我的博客支持https使用的是向StartCom CA申请签发的一年免费证书。StartCom是受信赖的CA机构,它的根证书被各种操作系统和浏览器内置信任,所以由它签发的证书也会被信任。
最近做了个iOS ipa包上传下载程序,也需要使用https链接,上网查了下发现可以自己签名证书,所以实践了下,下面是详细步骤。
特别推荐下面这个网站,讲的是…非常详细。
https://jamielinux.com/docs/openssl-certificate-authority/index.html
教程里有些功能了解就可以了,我们不需要使用,所以我去掉了其中一些步骤,简单好用些。
二. CA
自己当CA,就是用openssl命令生成自己的根证书,让用户安装信任它,那么所有用这个根证书签名的证书,就也可以被信任啦。
所以做为CA,我们首先要生成自己的根证书ca.cert.pem,而生成根证书需要ca.key.pem。
开始 创建/root/ca文件夹,所有CA的操作都会在这个文件夹执行。
 # mkdir /root/ca
    # cd /root/ca
    # mkdir certs crl newcerts private
    # chmod 700 private
    # touch index.txt
    # echo 1000 > serial
    # touch openssl.cnf
/root/ca:CA文件夹
/root/ca/certs:新签署证书和根证书存放的位置
/root/ca/crl:证书请求文件存放位置
/root/ca/newcerts:新签署证书存放的位置,是/root/ca/certs的备份
/root/ca/private:ca.key.pem存放位置,千万别丢失
/root/ca/index.txt:证书签名的纪录
/root/ca/serial:下一次证书签名的序列号,保存到index.txt
拷贝下面内容到/root/ca/openssl.cnf
# OpenSSL root CA configuration file.
# Copy to `/root/ca/openssl.cnf`.

[ ca ]
# `man ca`
default_ca = CA_default

[ CA_default ]
# Directory and file locations.
dir               = /root/ca
certs             = $dir/certs
crl_dir           = $dir/crl
new_certs_dir     = $dir/newcerts
database          = $dir/index.txt
serial            = $dir/serial
RANDFILE          = $dir/private/.rand

# The root key and root certificate.
private_key       = $dir/private/ca.key.pem
certificate       = $dir/certs/ca.cert.pem

# For certificate revocation lists.
crlnumber         = $dir/crlnumber
crl               = $dir/crl/ca.crl.pem
crl_extensions    = crl_ext
default_crl_days  = 30

# SHA-1 is deprecated, so use SHA-2 instead.
default_md        = sha256

name_opt          = ca_default
cert_opt          = ca_default
default_days      = 3750
preserve          = no
policy            = policy_strict

[ policy_strict ]
# The root CA should only sign intermediate certificates that match.
# See the POLICY FORMAT section of `man ca`.
countryName             = match
stateOrProvinceName     = match
organizationName        = match
organizationalUnitName  = optional
commonName              = supplied
emailAddress            = optional

[ policy_loose ]
# Allow the intermediate CA to sign a more diverse range of certificates.
# See the POLICY FORMAT section of the `ca` man page.
countryName             = optional
stateOrProvinceName     = optional
localityName            = optional
organizationName        = optional
organizationalUnitName  = optional
commonName              = supplied
emailAddress            = optional

[ req ]
# Options for the `req` tool (`man req`).
default_bits        = 2048
distinguished_name  = req_distinguished_name
string_mask         = utf8only

# SHA-1 is deprecated, so use SHA-2 instead.
default_md          = sha256

# Extension to add when the -x509 option is used.
x509_extensions     = v3_ca

[ req_distinguished_name ]
# See <https://en.wikipedia.org/wiki/Certificate_signing_request>.
countryName                     = Country Name (2 letter code)
stateOrProvinceName             = State or Province Name
localityName                    = Locality Name
0.organizationName              = Organization Name
organizationalUnitName          = Organizational Unit Name
commonName                      = Common Name
emailAddress                    = Email Address

# Optionally, specify some defaults.
countryName_default             = CN
stateOrProvinceName_default     = JiangSu
localityName_default            = NanJing
0.organizationName_default      = SIYOU325
organizationalUnitName_default  = SIYOU325
emailAddress_default            = webmaster@siyou325.com

[ v3_ca ]
# Extensions for a typical CA (`man x509v3_config`).
subjectKeyIdentifier = hash
authorityKeyIdentifier = keyid:always,issuer
basicConstraints = critical, CA:true
keyUsage = critical, digitalSignature, cRLSign, keyCertSign

[ v3_intermediate_ca ]
# Extensions for a typical intermediate CA (`man x509v3_config`).
subjectKeyIdentifier = hash
authorityKeyIdentifier = keyid:always,issuer
basicConstraints = critical, CA:true, pathlen:0
keyUsage = critical, digitalSignature, cRLSign, keyCertSign

[ usr_cert ]
# Extensions for client certificates (`man x509v3_config`).
basicConstraints = CA:FALSE
nsCertType = client, email
nsComment = "OpenSSL Generated Client Certificate"
subjectKeyIdentifier = hash
authorityKeyIdentifier = keyid,issuer
keyUsage = critical, nonRepudiation, digitalSignature, keyEncipherment
extendedKeyUsage = clientAuth, emailProtection

[ server_cert ]
# Extensions for server certificates (`man x509v3_config`).
basicConstraints = CA:FALSE
nsCertType = server
nsComment = "OpenSSL Generated Server Certificate"
subjectKeyIdentifier = hash
authorityKeyIdentifier = keyid,issuer:always
keyUsage = critical, digitalSignature, keyEncipherment
extendedKeyUsage = serverAuth

[ crl_ext ]
# Extension for CRLs (`man x509v3_config`).
authorityKeyIdentifier=keyid:always

[ ocsp ]
# Extension for OCSP signing certificates (`man ocsp`).
basicConstraints = CA:FALSE
subjectKeyIdentifier = hash
authorityKeyIdentifier = keyid,issuer
keyUsage = critical, digitalSignature
extendedKeyUsage = critical, OCSPSigning
具体的解释可以看上面的链接(真的是很推荐),这里我拣重要的说下
dir = /root/ca:这里需要改为上面的CA文件夹
policy = policy_strict:签CA证书使用strict策略
countryName_default = CN
0.organizationName_default = SIYOU325 CA
这两个是国家和组织名字,会显示到生成的证书上。简单的签个CA证书,我们只设置这两个值,其他都是空。
[ v3_ca ]:签CA证书需要这个配置
[ server_cert ]:接下来签服务端证书需要这个
生成root key
# cd /root/ca
# openssl genrsa -aes256 -out private/ca.key.pem 4096

输入两次密码siyou325123456,这个是很重要的密码,设置严格点。

# chmod 400 private/ca.key.pem
生成root certificate
# cd /root/ca
# openssl req -config openssl.cnf \
      -key private/ca.key.pem \
      -new -x509 -days 7500 -sha256 -extensions v3_ca \
      -out certs/ca.cert.pem

根据提示输入key的密码:siyou325123456
然后一值回车下去,使用默认值

# chmod 444 certs/ca.cert.pem
-days 7300:有效期20年
到这一步ca.key.pem(root key)和ca.cert.pem(root certificate)都已经生成好了,路径如下
/root/ca/private/ca.key.pem
/root/ca/certs/ca.cert.pem
至此生成根证书完成。
ca.key.pem密码是siyou325123456,非常重要,需要好好保存。
ca.cert.pem就是根证书,需要把它发给用户,让用户安装信任它,这样以后我们用这个证书签名的证书就都可以被信任了。
三. 生成服务端证书
CA角色要做的工作已经完成了,下面我们以用户这个角色,生成一个tomcat和nginx可以使用的服务端证书。
这里假设我们网站的域名或ip地址是127.0.0.1,那么在ca同级目录下创建127.0.0.1文件夹,生成服务端证书操作都在这个目录下进行。
# mkdir /root/127.0.0.1
# cd /root/127.0.0.1

# openssl genrsa -out server.key 2048
# openssl req -new -key server.key -out server.csr

会出现提示,简单点,除了下面几个,其他的都按回车就可以了。
Country Name输入:CN
Common Name输入域名或ip:127.0.0.1
A challenge password输入:server123456
openssl genrsa -out server.key 2048:这个命令后面2048代表加密位数,严格的使用4096,例如上面的根证书使用的就是这个,一般使用2048和1024就可以了,数值越大https链接等待时间越长。
到这儿,我们服务端key(server.key)和证书请求(server.csr)就生成啦。
接下来拷贝server.csr到ca/crl并改名为127.0.0.1.csr.pem
cp server.csr ../ca/crl/127.0.0.1.csr.pem
然后角色切换到CA角色,对这个请求进行处理。
首先修改下/root/ca/openssl.cnf
policy            = policy_strict
改为
policy            = policy_loose
policy_strict只在生成根证书的时候使用,其他时候使用loose策略就可以啦。
# cd /root/ca
# openssl ca -config openssl.cnf \
  -extensions server_cert -days 375 -notext -md sha256 \
  -in crl/127.0.0.1.csr.pem \
  -out certs/127.0.0.1.cert.pem
-days 375:有效期375天,默认值也是375天
这时候,你会发现
/root/ca/certs下多了127.0.0.1.cert.pem(这个就是生成好的证书) newcerts下面多了1000.pem(这个是证书备份,1000是从serial中取的) /root/ca/index.txt多了行纪录
/root/ca/index.txt
V   171014020124Z       1000    unknown /C=CN/ST=Some-State/O=Internet Widgits Pty Ltd/CN=127.0.0.1
/root/ca/serial中的值+1变成了1001。 将/root/ca/certs/127.0.0.1.cert.pem证书发给用户,CA角色的工作就完成啦。
角色切换回用户,我们将CA发给我们的127.0.0.1.cert.pem拷贝到/root/127.0.0.1目录下,并改名为server.crt。
这时我们目录下有下面三个文件
server.crt server.csr server.key
server.crt就是我们要的证书,我们可以配置nginx支持https啦。
nginx配置
server {
    listen       443;
    server_name  127.0.0.1;

    ssl on;
    ssl_certificate      /root/127.0.0.1/server.crt;
    ssl_certificate_key  /root/127.0.0.1/server.key;
    ssl_session_cache    shared:SSL:1m;
    ssl_session_timeout  10m;
    ssl_ciphers  HIGH:!aNULL:!MD5;
    ssl_prefer_server_ciphers  on;

    location / {
        proxy_pass   http://127.0.0.1;
    }

    location ~ ^(.*)\/\.svn\/ {
        deny all;
    }
}
要支持tomcat的话,我们还需要进行下面的操作。
# cd /root/127.0.0.1
# openssl pkcs12 -export \
    -in server.crt \
    -inkey server.key \
    -out server.p12

输入两次密码:server123456

# keytool -importkeystore -v \
    -srckeystore  server.p12 \
    -srcstoretype pkcs12 \
    -srcstorepass server123456 \
    -destkeystore server.keystore \
    -deststoretype jks \
    -deststorepass server123456
操作后的文件目录
server.crt      server.csr      server.key
server.p12      server.keystore
tomcat配置
<Connector SSLEnabled="true" clientAuth="false"
keystoreFile="/root/127.0.0.1/server.keystore"
keystorePass="server123456"
maxThreads="150" port="8443" protocol="org.apache.coyote.http11.Http11Protocol" scheme="https" secure="true" sslProtocol="TLS"/>
结尾 以后如果需要生成别的服务端证书,我们就只用从 三. 生成服务端证书开始就可以啦,是不是很easy.
参考:
https://jamielinux.com/docs/openssl-certificate-authority/index.html http://blog.csdn.net/RazerTang/article/details/46898051/ computer system https ca
Share:
1 做事情一定不能拖,本来打算这周完成两篇arts的,结果别的事情一忙,就只能写一篇了。
2 真的佩服崔永元,先是举报fbb,然后如下图,崔做了很多人想做不做的事,或是敢做却无法做到的事,后果就是崔面临死的威胁。中国缺少崔这样的人,愿崔平安。